
如需转载,请根据 知识共享署名-非商业性使用-相同方式共享 4.0 国际许可协议 许可,附上本文作者及链接。
本文作者: 执笔成念
作者昵称: zbcn
本文链接: https://1363653611.github.io/zbcn.github.io/2020/10/11/web_01%E9%A1%B9%E7%9B%AE/
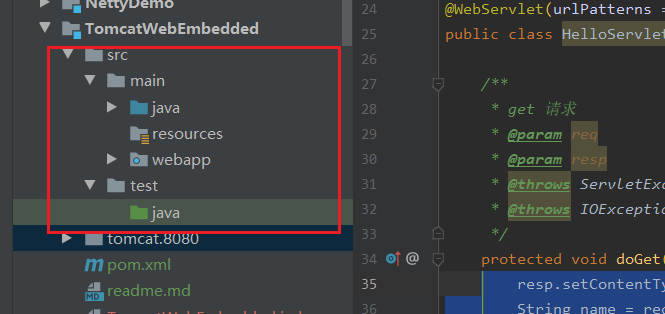
新建 web-app 的maven项目
- 新建maven项目
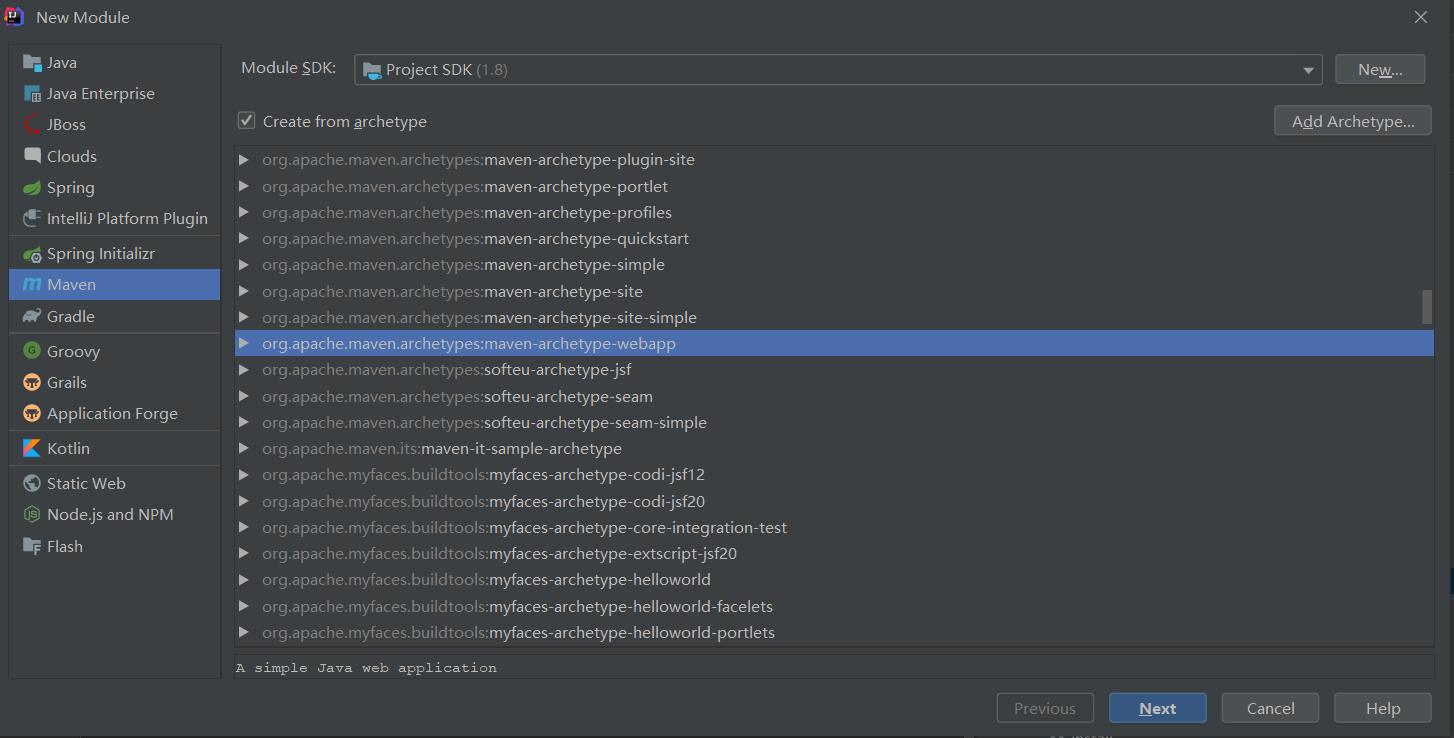
- 配置项目结构
内置 tomcat 引入
- 如果需要内置tomcat ,则需要引入内嵌tomcat依赖
1 | <dependency> |
2 | <groupId>org.apache.tomcat.embed</groupId> |
3 | <artifactId>tomcat-embed-core</artifactId> |
4 | <version>${tomcat.version}</version> |
5 | <scope>compile</scope> |
6 | </dependency> |
7 | <dependency> |
8 | <groupId>org.apache.tomcat.embed</groupId> |
9 | <artifactId>tomcat-embed-jasper</artifactId> |
10 | <version>${tomcat.version}</version> |
11 | <scope>compile</scope> |
12 | </dependency> |
说明: 如果不引入内置tomcat,则利用maven 将项目打成war 包,解压到tomcat 的 webapp 目录下即可.(项目名称改成ROOT,因为tomcat 默认路径式 ROOT(访问接口不需要项目名称),否则启动后,访问时,需要带项目名称)
- 内置tomcat 集成,利用main 方法启动
1 | public static void main(String[] args) throws LifecycleException { |
2 | // 启动Tomcat: |
3 | Tomcat tomcat = new Tomcat(); |
4 | tomcat.setPort(Integer.getInteger("port", 8080)); |
5 | tomcat.getConnector(); |
6 | // 创建webapp: |
7 | Context ctx = tomcat.addWebapp("", new File("src/main/webapp").getAbsolutePath()); |
8 | WebResourceRoot resources = new StandardRoot(ctx); |
9 | resources.addPreResources( |
10 | new DirResourceSet(resources, "/WEB-INF/classes", new File("target/classes").getAbsolutePath(), "/")); |
11 | ctx.setResources(resources); |
12 | tomcat.start(); |
13 | tomcat.getServer().await(); |
14 | } |
非内置方式,需要在 pom.xml 中引入Servlet API 的依赖
1 | <dependency> |
2 | <groupId>javax.servlet</groupId> |
3 | <artifactId>javax.servlet-api</artifactId> |
4 | <version>4.0.0</version> |
5 | <scope>provided</scope> |
6 | </dependency> |
引入 Servlet API
注解方式
1 | /** |
2 | * |
3 | *@WebServlet 相当于 在web.xml中配置 |
4 | * <servlet> |
5 | * <servlet-name>helloServlet</servlet-name> |
6 | * <servlet-class>xxx.HelloServlet</servlet-class> |
7 | * </servlet> |
8 | * <servlet-mapping> |
9 | * <servlet-name>helloServlet</servlet-name> |
10 | * <url-pattern>/hello</url-pattern> |
11 | * </servlet-mapping> |
12 | * 重定向 |
13 | */ |
14 | (urlPatterns = "/hello") |
15 | public class HelloServlet extends HttpServlet { |
16 | |
17 | /** |
18 | * get 请求 |
19 | * @param req |
20 | * @param resp |
21 | * @throws ServletException |
22 | * @throws IOException |
23 | */ |
24 | protected void doGet(HttpServletRequest req, HttpServletResponse resp) throws ServletException, IOException { |
25 | resp.setContentType("text/html"); |
26 | String name = req.getParameter("name"); |
27 | if (name == null) { |
28 | name = "world"; |
29 | } |
30 | PrintWriter pw = resp.getWriter(); |
31 | pw.write("<h1>Hello, " + name + "!</h1>"); |
32 | pw.flush(); |
33 | |
34 | } |
35 | } |
xml 方式
- web.xml 中配置servlet
1 | <servlet> |
2 | <servlet-name>xmlServlet</servlet-name> |
3 | <servlet-class>com.zbcn.web.servlet.WebXmlServlet</servlet-class> |
4 | </servlet> |
5 | <servlet-mapping> |
6 | <servlet-name>xmlServlet</servlet-name> |
7 | <url-pattern>/xml</url-pattern> |
8 | </servlet-mapping> |
- 编写Servlet 类
1 | /** |
2 | * 在web.xml 中配置 |
3 | * <br/> |
4 | * @author zbcn8 |
5 | * @since 2020/10/1 11:56 |
6 | */ |
7 | public class WebXmlServlet extends HttpServlet { |
8 | |
9 | protected void doGet(HttpServletRequest req, HttpServletResponse resp) throws ServletException, IOException { |
10 | resp.setContentType("text/html"); |
11 | String name = req.getParameter("name"); |
12 | if (name == null) { |
13 | name = "world"; |
14 | } |
15 | PrintWriter pw = resp.getWriter(); |
16 | pw.write("<h1>Hello, " + name + "!</h1><br/><h2>test xml config</h2>"); |
17 | pw.flush(); |
18 | } |
19 | } |
Servlet 进阶
路径映射
一个Web App就是由一个或多个Servlet组成的,每个Servlet通过注解说明自己能处理的路径。
例如:
1 | //HelloServlet能处理/hello这个路径的请求。 |
2 | (urlPatterns = "/hello") |
3 | public class HelloServlet extends HttpServlet { |
4 | ... |
5 | } |
早期的Servlet需要在web.xml中配置映射路径,但最新Servlet版本只需要通过注解就可以完成映射。
- 因为浏览器发送请求的时候,还会有请求方法(HTTP Method):即GET、POST、PUT等不同类型的请求。因此,要处理GET请求,我们要覆写
doGet()方法:
1 | (urlPatterns = "/hello") |
2 | public class HelloServlet extends HttpServlet { |
3 | |
4 | protected void doGet(HttpServletRequest req, HttpServletResponse resp) throws ServletException, IOException { |
5 | ... |
6 | } |
7 | } |
- 要处理POST请求,就需要覆写
doPost()方法。如果没有覆写doPost()方法,查看一下HttpServlet的doPost()方法就一目了然了:它会直接返回405或400错误。因此,一个Servlet如果映射到/hello,那么所有请求方法都会由这个Servlet处理,至于能不能返回200成功响应,要看有没有覆写对应的请求方法。 - 一个Webapp完全可以有多个Servlet,分别映射不同的路径。例如:
1 | (urlPatterns = "/hello") |
2 | public class HelloServlet extends HttpServlet { |
3 | ... |
4 | } |
5 | |
6 | (urlPatterns = "/signin") |
7 | public class SignInServlet extends HttpServlet { |
8 | ... |
9 | } |
10 | |
11 | (urlPatterns = "/") |
12 | public class IndexServlet extends HttpServlet { |
13 | ... |
14 | } |
浏览器发送 http 请求
- 浏览器发出的HTTP请求总是由Web Server先接收,然后,根据Servlet配置的映射,不同的路径转发到不同的Servlet:
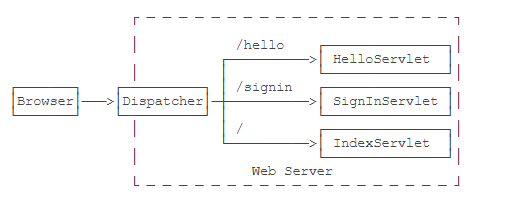
这种根据路径转发的功能我们一般称为Dispatch。映射到/的IndexServlet比较特殊,它实际上会接收所有未匹配的路径,相当于/*,因为Dispatcher的逻辑可以用伪代码实现如下:
1 | String path = ... |
2 | if (path.equals("/hello")) { |
3 | dispatchTo(helloServlet); |
4 | } else if (path.equals("/signin")) { |
5 | dispatchTo(signinServlet); |
6 | } else { |
7 | // 所有未匹配的路径均转发到"/" |
8 | dispatchTo(indexServlet); |
9 | } |
HttpServletRequest
HttpServletRequest封装了一个HTTP请求,它实际上是从ServletRequest继承而来。最早设计Servlet时,设计者希望Servlet不仅能处理HTTP,也能处理类似SMTP等其他协议,因此,单独抽出了ServletRequest接口,但实际上除了HTTP外,并没有其他协议会用Servlet处理,所以这是一个过度设计。
我们通过HttpServletRequest提供的接口方法可以拿到HTTP请求的几乎全部信息,常用的方法有:
- getMethod():返回请求方法,例如,
"GET","POST"; - getRequestURI():返回请求路径,但不包括请求参数,例如,
"/hello"; - getQueryString():返回请求参数,例如,
"name=Bob&a=1&b=2"; - getParameter(name):返回请求参数,GET请求从URL读取参数,POST请求从Body中读取参数;
- getContentType():获取请求Body的类型,例如,
"application/x-www-form-urlencoded"; - getContextPath():获取当前Webapp挂载的路径,对于ROOT来说,总是返回空字符串
""; - getCookies():返回请求携带的所有Cookie;
- getHeader(name):获取指定的Header,对Header名称不区分大小写;
- getHeaderNames():返回所有Header名称;
- getInputStream():如果该请求带有HTTP Body,该方法将打开一个输入流用于读取Body;
- getReader():和getInputStream()类似,但打开的是Reader;
- getRemoteAddr():返回客户端的IP地址;
- getScheme():返回协议类型,例如,
"http","https";
HttpServletRequest还有两个方法:setAttribute()和getAttribute(),可以给当前HttpServletRequest对象附加多个Key-Value,相当于把HttpServletRequest当作一个Map<String, Object>使用。调用
HttpServletRequest的方法时,注意务必阅读接口方法的文档说明,因为有的方法会返回null,例如getQueryString()的文档就写了:... This method returns null if the URL does not have a query string...
HttpServletResponse
HttpServletResponse封装了一个HTTP响应。由于HTTP响应必须先发送Header,再发送Body,所以,操作HttpServletResponse对象时,必须先调用设置Header的方法,最后调用发送Body的方法。
常用的设置Header的方法有:
- setStatus(sc):设置响应代码,默认是
200; - setContentType(type):设置Body的类型,例如,
"text/html"; - setCharacterEncoding(charset):设置字符编码,例如,
"UTF-8"; - setHeader(name, value):设置一个Header的值;
- addCookie(cookie):给响应添加一个Cookie;
- addHeader(name, value):给响应添加一个Header,因为HTTP协议允许有多个相同的Header;
写入响应时,需要通过getOutputStream()获取写入流,或者通过getWriter()获取字符流,二者只能获取其中一个。
写入响应前,无需设置setContentLength(),因为底层服务器会根据写入的字节数自动设置,如果写入的数据量很小,实际上会先写入缓冲区,如果写入的数据量很大,服务器会自动采用Chunked编码让浏览器能识别数据结束符而不需要设置Content-Length头。
但是,写入完毕后调用flush()却是必须的,因为大部分Web服务器都基于HTTP/1.1协议,会复用TCP连接。如果没有调用flush(),将导致缓冲区的内容无法及时发送到客户端。此外,写入完毕后千万不要调用close(),原因同样是因为会复用TCP连接,如果关闭写入流,将关闭TCP连接,使得Web服务器无法复用此TCP连接。
note: 写入完毕后对输出流调用flush()而不是close()方法!
有了HttpServletRequest和HttpServletResponse这两个高级接口,我们就不需要直接处理HTTP协议。注意到具体的实现类是由各服务器提供的,而我们编写的Web应用程序只关心接口方法,并不需要关心具体实现的子类。
Servlet多线程模型
一个Servlet类在服务器中只有一个实例,但对于每个HTTP请求,Web服务器会使用多线程执行请求。因此,一个Servlet的doGet()、doPost()等处理请求的方法是多线程并发执行的。如果Servlet中定义了字段,要注意多线程并发访问的问题:
1 | public class HelloServlet extends HttpServlet { |
2 | private Map<String, String> map = new ConcurrentHashMap<>(); |
3 | |
4 | protected void doGet(HttpServletRequest req, HttpServletResponse resp) throws ServletException, IOException { |
5 | // 注意读写map字段是多线程并发的: |
6 | this.map.put(key, value); |
7 | } |
8 | } |
对于每个请求,Web服务器会创建唯一的
HttpServletRequest和HttpServletResponse实例,因此,HttpServletRequest和HttpServletResponse实例只有在当前处理线程中有效,它们总是局部变量,不存在多线程共享的问题。
总结
- 一个Webapp中的多个Servlet依靠路径映射来处理不同的请求;
- 映射为
/的Servlet可处理所有“未匹配”的请求; - 如何处理请求取决于Servlet覆写的对应方法;
- Web服务器通过多线程处理HTTP请求,一个Servlet的处理方法可以由多线程并发执行。
重定向与重新转发
Redirect
重定向是指当浏览器请求一个URL时,服务器返回一个重定向指令,告诉浏览器地址已经变了,麻烦使用新的URL再重新发送新请求。
我们已经编写了一个能处理/hello的HelloServlet,如果收到的路径为/hi,希望能重定向到/hello,可以再编写一个RedirectServlet:
1 | (urlPatterns = "/hi") |
2 | public class RedirectServlet extends HttpServlet { |
3 | protected void doGet(HttpServletRequest req, HttpServletResponse resp) throws ServletException, IOException { |
4 | // 构造重定向的路径: |
5 | String name = req.getParameter("name"); |
6 | String redirectToUrl = "/hello" + (name == null ? "" : "?name=" + name); |
7 | // 发送重定向响应: |
8 | resp.sendRedirect(redirectToUrl); |
9 | } |
10 | } |
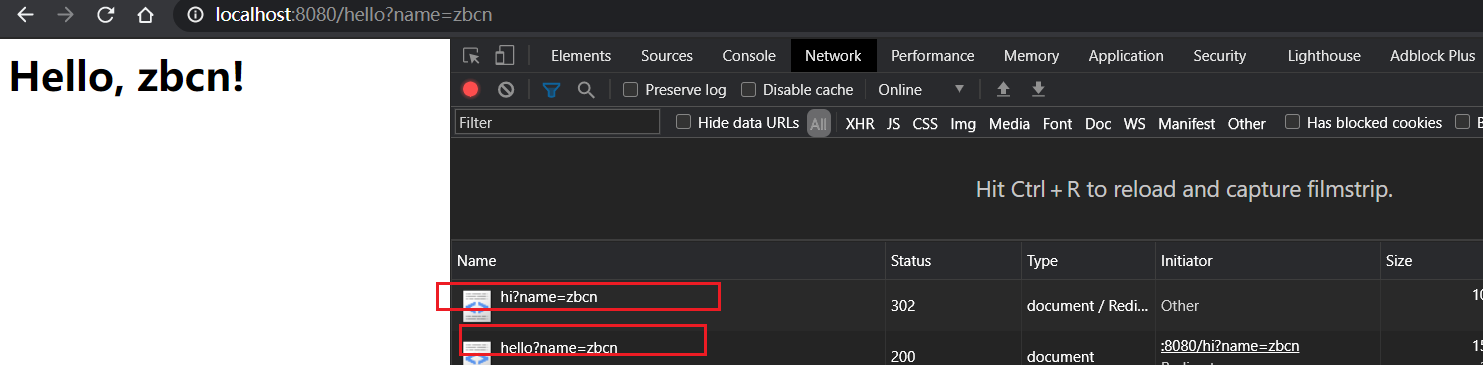
如果浏览器发送GET /hi请求,RedirectServlet将处理此请求。由于RedirectServlet在内部又发送了重定向响应,因此,浏览器会收到如下响应:
1 | HTTP/1.1 302 Found |
2 | Location: /hello |
当浏览器收到302响应后,它会立刻根据Location的指示发送一个新的GET /hello请求,这个过程就是重定向:
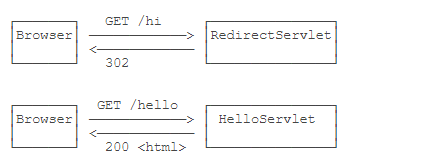
观察Chrome浏览器的网络请求,可以看到两次HTTP请求:
重定向有两种
- 一种是302响应,称为临时重定向,一种是301响应,称为永久重定向。
- 两者的区别是,如果服务器发送301永久重定向响应,浏览器会缓存
/hi到/hello这个重定向的关联,下次请求/hi的时候,浏览器就直接发送/hello请求了
重定向作用
重定向的目的是当Web应用升级后,如果请求路径发生了变化,可以将原来的路径重定向到新路径,从而避免浏览器请求原路径找不到资源。
两种重定向的写法
HttpServletResponse提供了快捷的redirect()方法实现302重定向。如果要实现301永久重定向,可以这么写:
1 | resp.setStatus(HttpServletResponse.SC_MOVED_PERMANENTLY); // 301 |
2 | resp.setHeader("Location", "/hello"); |
Forward
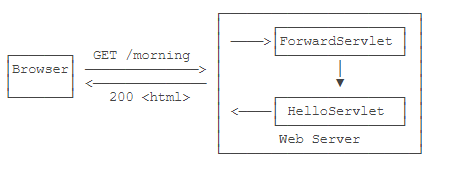
Forward是指内部转发。当一个Servlet处理请求的时候,它可以决定自己不继续处理,而是转发给另一个Servlet处理。
例如,我们已经编写了一个能处理/hello的HelloServlet,继续编写一个能处理/morning的ForwardServlet:
1 | /** |
2 | * 请求重新转发 |
3 | * <br/> |
4 | * @author zbcn8 |
5 | * @since 2020/10/3 10:53 |
6 | */ |
7 | (urlPatterns = "/hell") |
8 | public class ForwardServlet extends HttpServlet { |
9 | |
10 | public void doGet(HttpServletRequest req, HttpServletResponse resp) throws ServletException, IOException { |
11 | // 发送重定重新转发: |
12 | req.getRequestDispatcher("/hello").forward(req,resp); |
13 | } |
14 | } |
ForwardServlet在收到请求后,它并不自己发送响应,而是把请求和响应都转发给路径为/hello的Servlet,即下面的代码:
1 | req.getRequestDispatcher("/hello").forward(req, resp); |
- 后续请求的处理实际上是由
HelloServlet完成的,没有经过浏览器(浏览器无感知)。这种处理方式称为转发(Forward),我们用流程图画出来如下:
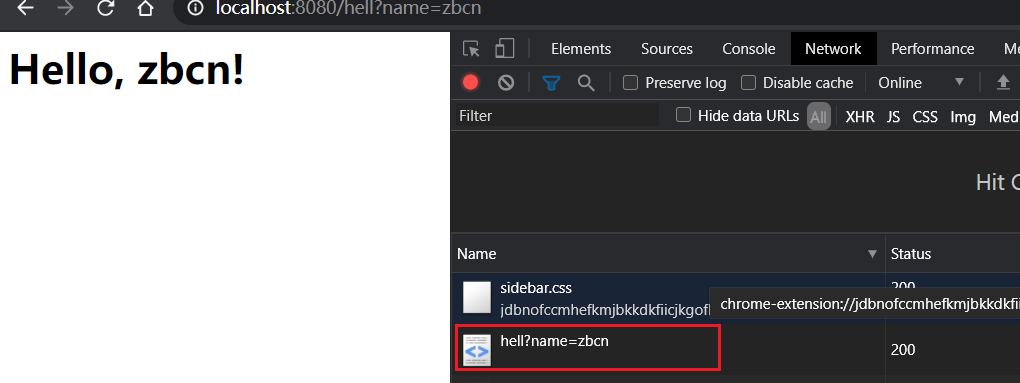
- 转发和重定向的区别在于,转发是在Web服务器内部完成的,对浏览器来说,它只发出了一个HTTP请求:
总结
- 使用重定向时,浏览器知道重定向规则,并且会自动发起新的HTTP请求;
- 使用转发时,浏览器并不知道服务器内部的转发逻辑。