
如需转载,请根据 知识共享署名-非商业性使用-相同方式共享 4.0 国际许可协议 许可,附上本文作者及链接。
本文作者: 执笔成念
作者昵称: zbcn
本文链接: https://1363653611.github.io/zbcn.github.io/2021/01/20/springcloud20-%E5%BE%AE%E6%9C%8D%E5%8A%A1%E6%9E%B6%E6%9E%84%E6%9C%80%E7%BB%88%E8%A7%A3%E5%86%B3%E6%96%B9%E6%A1%88/
Spring Cloud Gateway + Oauth2 实现统一认证和鉴权!
一个比较好的微服务解决方案:可以通过认证服务进行统一认证,然后通过网关来统一校验认证和鉴权。此方案为目前最新方案,仅支持Spring Boot 2.2.0、Spring Cloud Hoxton 以上版本。
前置知识
我们将采用Nacos作为注册中心,Gateway作为网关,使用nimbus-jose-jwtJWT库操作JWT令牌。
相关知识:
应用架构
我们理想的解决方案应该是这样的,认证服务负责认证,网关负责校验认证和鉴权,其他API服务负责处理自己的业务逻辑。安全相关的逻辑只存在于认证服务和网关服务中,其他服务只是单纯地提供服务而没有任何安全相关逻辑。
相关服务划分:
- micro-oauth2-gateway:网关服务,负责请求转发和鉴权功能,整合Spring Security+Oauth2;
- micro-oauth2-auth:Oauth2认证服务,负责对登录用户进行认证,整合Spring Security+Oauth2;
- micro-oauth2-api:受保护的API服务,用户鉴权通过后可以访问该服务,不整合Spring Security+Oauth2。
方案实现
micro-oauth2-auth 认证服务
我们首先来搭建认证服务,它将作为Oauth2的认证服务使用,并且网关服务的鉴权功能也需要依赖它。
- 在
pom.xml中添加相关依赖,主要是Spring Security、Oauth2、JWT、Redis相关依赖;
1 | <dependencies> |
2 | <dependency> |
3 | <groupId>org.springframework.boot</groupId> |
4 | <artifactId>spring-boot-starter-web</artifactId> |
5 | </dependency> |
6 | <dependency> |
7 | <groupId>org.springframework.boot</groupId> |
8 | <artifactId>spring-boot-starter-security</artifactId> |
9 | </dependency> |
10 | <dependency> |
11 | <groupId>org.springframework.cloud</groupId> |
12 | <artifactId>spring-cloud-starter-oauth2</artifactId> |
13 | </dependency> |
14 | <dependency> |
15 | <groupId>com.nimbusds</groupId> |
16 | <artifactId>nimbus-jose-jwt</artifactId> |
17 | <version>8.16</version> |
18 | </dependency> |
19 | <!-- redis --> |
20 | <dependency> |
21 | <groupId>org.springframework.boot</groupId> |
22 | <artifactId>spring-boot-starter-data-redis</artifactId> |
23 | </dependency> |
24 | </dependencies> |
- 在
application.yml中添加相关配置,主要是Nacos和Redis相关配置
1 | server: |
2 | port: 9401 |
3 | spring: |
4 | application: |
5 | name: micro-auth2-auth |
6 | profiles: |
7 | active: dev |
8 | redis: #redis相关配置 |
9 | host: localhost |
10 | port: 6379 |
11 | database: 1 |
12 | cloud: |
13 | nacos: |
14 | discovery: |
15 | group: micro |
16 | server-addr: http://localhost:8848/ |
17 | jackson: |
18 | date-format: yyyy-MM-dd HH:mm:ss |
19 | |
20 | management: |
21 | endpoints: |
22 | web: |
23 | exposure: |
24 | include: "*" |
- 使用
keytool生成RSA证书jwt.jks,复制到resource目录下,在JDK的bin目录下使用如下命令即可;
1 | keytool -genkey -alias jwt -keyalg RSA -keystore jwt.jks |
- 配置Spring Security,允许获取公钥接口的访问;
1 | |
2 | |
3 | public class WebSecurityConfig extends WebSecurityConfigurerAdapter { |
4 | |
5 | |
6 | protected void configure(HttpSecurity http) throws Exception { |
7 | http.authorizeRequests() |
8 | .requestMatchers(EndpointRequest.toAnyEndpoint()).permitAll() |
9 | .antMatchers("/rsa/publicKey").permitAll() |
10 | .anyRequest().authenticated(); |
11 | } |
12 | |
13 | |
14 | |
15 | public AuthenticationManager authenticationManagerBean() throws Exception { |
16 | return super.authenticationManagerBean(); |
17 | } |
18 | |
19 | /** |
20 | * 密码加密 |
21 | * @return |
22 | */ |
23 | |
24 | public PasswordEncoder passwordEncoder() { |
25 | return new BCryptPasswordEncoder(); |
26 | } |
27 | } |
- 创建
UserServiceImpl类实现Spring Security的UserDetailsService接口,用于加载用户信息;
1 | |
2 | public class UserServiceImpl implements UserDetailsService { |
3 | |
4 | /** |
5 | * 用户信息 |
6 | */ |
7 | private List<UserDTO> userList; |
8 | |
9 | |
10 | private PasswordEncoder passwordEncoder; |
11 | |
12 | /** |
13 | * 初始化模拟的用户信息 |
14 | */ |
15 | |
16 | public void init(){ |
17 | String password = passwordEncoder.encode("123456"); |
18 | userList = new ArrayList<>(); |
19 | userList.add(new UserDTO(1L,"admin", password,1, CollUtil.toList("ADMIN"))); |
20 | userList.add(new UserDTO(2L,"test", password,1, CollUtil.toList("TEST"))); |
21 | } |
22 | |
23 | |
24 | public UserDetails loadUserByUsername(String username) throws UsernameNotFoundException { |
25 | List<UserDTO> findUserList = userList.stream().filter(item -> item.getUsername().equals(username)).collect(Collectors.toList()); |
26 | if (CollUtil.isEmpty(findUserList)) { |
27 | throw new UsernameNotFoundException(MessageConstant.USERNAME_PASSWORD_ERROR); |
28 | } |
29 | SecurityUser securityUser = new SecurityUser(findUserList.get(0)); |
30 | if (!securityUser.isEnabled()) { |
31 | throw new DisabledException(MessageConstant.ACCOUNT_DISABLED); |
32 | } else if (!securityUser.isAccountNonLocked()) { |
33 | throw new LockedException(MessageConstant.ACCOUNT_LOCKED); |
34 | } else if (!securityUser.isAccountNonExpired()) { |
35 | throw new AccountExpiredException(MessageConstant.ACCOUNT_EXPIRED); |
36 | } else if (!securityUser.isCredentialsNonExpired()) { |
37 | throw new CredentialsExpiredException(MessageConstant.CREDENTIALS_EXPIRED); |
38 | } |
39 | return securityUser; |
40 | } |
41 | } |
- 添加认证服务相关配置
Oauth2ServerConfig,需要配置加载用户信息的服务UserServiceImpl及RSA的钥匙对KeyPair;
1 | |
2 | |
3 | |
4 | public class Oauth2ServerConfig extends AuthorizationServerConfigurerAdapter { |
5 | |
6 | private final PasswordEncoder passwordEncoder; |
7 | private final UserServiceImpl userDetailsService; |
8 | private final AuthenticationManager authenticationManager; |
9 | private final JwtTokenEnhancer jwtTokenEnhancer; |
10 | |
11 | |
12 | public void configure(ClientDetailsServiceConfigurer clients) throws Exception { |
13 | clients.inMemory() |
14 | .withClient("client-app") |
15 | .secret(passwordEncoder.encode("123456")) |
16 | .scopes("all") |
17 | .authorizedGrantTypes("password", "refresh_token") |
18 | .accessTokenValiditySeconds(3600) |
19 | .refreshTokenValiditySeconds(86400); |
20 | } |
21 | |
22 | |
23 | public void configure(AuthorizationServerEndpointsConfigurer endpoints) throws Exception { |
24 | TokenEnhancerChain enhancerChain = new TokenEnhancerChain(); |
25 | List<TokenEnhancer> delegates = new ArrayList<>(); |
26 | delegates.add(jwtTokenEnhancer); |
27 | delegates.add(accessTokenConverter()); |
28 | enhancerChain.setTokenEnhancers(delegates); //配置JWT的内容增强器 |
29 | endpoints.authenticationManager(authenticationManager) |
30 | .userDetailsService(userDetailsService) //配置加载用户信息的服务 |
31 | .accessTokenConverter(accessTokenConverter()) |
32 | .tokenEnhancer(enhancerChain); |
33 | } |
34 | |
35 | |
36 | public void configure(AuthorizationServerSecurityConfigurer security) throws Exception { |
37 | security.allowFormAuthenticationForClients(); |
38 | } |
39 | |
40 | |
41 | public JwtAccessTokenConverter accessTokenConverter() { |
42 | JwtAccessTokenConverter jwtAccessTokenConverter = new JwtAccessTokenConverter(); |
43 | jwtAccessTokenConverter.setKeyPair(keyPair()); |
44 | return jwtAccessTokenConverter; |
45 | } |
46 | |
47 | |
48 | public KeyPair keyPair() { |
49 | //从classpath下的证书中获取秘钥对 |
50 | KeyStoreKeyFactory keyStoreKeyFactory = new KeyStoreKeyFactory(new ClassPathResource("jwt.jks"), "123456".toCharArray()); |
51 | return keyStoreKeyFactory.getKeyPair("jwt", "123456".toCharArray()); |
52 | } |
53 | } |
- 如果你想往JWT中添加自定义信息的话,比如说
登录用户的ID,可以自己实现TokenEnhancer接口;
1 | |
2 | public class JwtTokenEnhancer implements TokenEnhancer { |
3 | |
4 | public OAuth2AccessToken enhance(OAuth2AccessToken accessToken, OAuth2Authentication authentication) { |
5 | SecurityUser securityUser = (SecurityUser) authentication.getPrincipal(); |
6 | Map<String, Object> info = new HashMap<>(); |
7 | //把用户ID设置到JWT中 |
8 | info.put("id", securityUser.getId()); |
9 | ((DefaultOAuth2AccessToken) accessToken).setAdditionalInformation(info); |
10 | return accessToken; |
11 | } |
12 | } |
- 由于我们的网关服务需要RSA的公钥来验证签名是否合法,所以认证服务需要有个接口把公钥暴露出来;
1 | |
2 | public class KeyPairController { |
3 | |
4 | private KeyPair keyPair; |
5 | |
6 | ("/rsa/publicKey") |
7 | public Map<String, Object> getKey() { |
8 | RSAPublicKey publicKey = (RSAPublicKey) keyPair.getPublic(); |
9 | RSAKey key = new RSAKey.Builder(publicKey).build(); |
10 | return new JWKSet(key).toJSONObject(); |
11 | } |
12 | } |
- redis 操作组件配置
1 | |
2 | |
3 | public class RedisRepositoryConfig { |
4 | |
5 | public RedisTemplate<String, Object> redisTemplate(RedisConnectionFactory connectionFactory) { |
6 | RedisTemplate<String, Object> redisTemplate = new RedisTemplate<>(); |
7 | redisTemplate.setConnectionFactory(connectionFactory); |
8 | StringRedisSerializer stringRedisSerializer = new StringRedisSerializer(); |
9 | redisTemplate.setKeySerializer(stringRedisSerializer); |
10 | redisTemplate.setHashKeySerializer(stringRedisSerializer); |
11 | Jackson2JsonRedisSerializer<?> jackson2JsonRedisSerializer = new Jackson2JsonRedisSerializer<>(Object.class); |
12 | redisTemplate.setValueSerializer(jackson2JsonRedisSerializer); |
13 | redisTemplate.setHashValueSerializer(jackson2JsonRedisSerializer); |
14 | redisTemplate.afterPropertiesSet(); |
15 | return redisTemplate; |
16 | } |
17 | } |
- 创建一个资源服务
ResourceServiceImpl,初始化的时候把资源与角色匹配关系缓存到Redis中,方便网关服务进行鉴权的时候获取。
1 | |
2 | public class ResourceServiceImpl { |
3 | |
4 | private Map<String, List<String>> resourceRolesMap; |
5 | |
6 | private RedisTemplate<String,Object> redisTemplate; |
7 | |
8 | |
9 | public void initData() { |
10 | resourceRolesMap = new TreeMap<>(); |
11 | resourceRolesMap.put("/api/hello", CollUtil.toList("ADMIN")); |
12 | resourceRolesMap.put("/api/user/currentUser", CollUtil.toList("ADMIN", "TEST")); |
13 | redisTemplate.opsForHash().putAll(RedisConstant.RESOURCE_ROLES_MAP, resourceRolesMap); |
14 | } |
15 | } |
micro-oauth2-gateway
接下来我们就可以搭建网关服务了,它将作为Oauth2的资源服务、客户端服务使用,对访问微服务的请求进行统一的校验认证和鉴权操作。
- 在
pom.xml中添加相关依赖,主要是Gateway、Oauth2和JWT相关依赖;
1 | <dependencies> |
2 | <dependency> |
3 | <groupId>org.springframework.boot</groupId> |
4 | <artifactId>spring-boot-starter-webflux</artifactId> |
5 | </dependency> |
6 | <dependency> |
7 | <groupId>org.springframework.cloud</groupId> |
8 | <artifactId>spring-cloud-starter-gateway</artifactId> |
9 | </dependency> |
10 | <dependency> |
11 | <groupId>org.springframework.security</groupId> |
12 | <artifactId>spring-security-config</artifactId> |
13 | </dependency> |
14 | <dependency> |
15 | <groupId>org.springframework.security</groupId> |
16 | <artifactId>spring-security-oauth2-resource-server</artifactId> |
17 | </dependency> |
18 | <dependency> |
19 | <groupId>org.springframework.security</groupId> |
20 | <artifactId>spring-security-oauth2-client</artifactId> |
21 | </dependency> |
22 | <dependency> |
23 | <groupId>org.springframework.security</groupId> |
24 | <artifactId>spring-security-oauth2-jose</artifactId> |
25 | </dependency> |
26 | <dependency> |
27 | <groupId>com.nimbusds</groupId> |
28 | <artifactId>nimbus-jose-jwt</artifactId> |
29 | <version>8.16</version> |
30 | </dependency> |
31 | </dependencies> |
- 在
application.yml中添加相关配置,主要是路由规则的配置、Oauth2中RSA公钥的配置及路由白名单的配置;
1 | server: |
2 | port: 9201 |
3 | spring: |
4 | application: |
5 | name: micro-oauth2-gateway |
6 | profiles: |
7 | active: dev |
8 | jackson: |
9 | date-format: yyyy-MM-dd HH:mm:ss |
10 | redis: # redis |
11 | database: 0 |
12 | port: 6379 |
13 | host: localhost |
14 | cloud: |
15 | nacos: # 注册中心 |
16 | discovery: |
17 | group: micro |
18 | server-addr: http://localhost:8848/ |
19 | gateway: |
20 | routes: # 配置路由规则 |
21 | - id: oauth2-api-route |
22 | uri: lb://micro-oauth2-api |
23 | predicates: |
24 | - Path=/api/** |
25 | filters: |
26 | - StripPrefix=1 |
27 | - id: oauth2-auth-route |
28 | uri: lb://micro-oauth2-auth |
29 | predicates: |
30 | - Path=/auth/** |
31 | filters: |
32 | - StripPrefix=1 |
33 | discovery: |
34 | locator: |
35 | enabled: true #开启从注册中心动态创建路由的功能 |
36 | lower-case-service-id: true #使用小写服务名,默认是大写 |
37 | security: |
38 | oauth2: |
39 | resourceserver: |
40 | jwt: |
41 | jwk-set-uri: http://localhost:9401/rsa/publicKey #配置RSA的公钥访问地址 |
42 | secure: |
43 | ignore: |
44 | urls: #配置白名单路径 |
45 | - "/actuator/**" |
46 | - "/auth/oauth/token" |
47 | |
48 | management: |
49 | endpoints: |
50 | web: |
51 | exposure: |
52 | include: "*" |
- 对网关服务进行配置安全配置,由于Gateway使用的是
WebFlux,所以需要使用@EnableWebFluxSecurity注解开启;
1 | // 资源服务器配置 |
2 | |
3 | |
4 | |
5 | public class ResourceServerConfig { |
6 | /** |
7 | * 鉴权管理器,用于判断是否有资源的访问权限 |
8 | */ |
9 | private final AuthorizationManager authorizationManager; |
10 | private final IgnoreUrlsConfig ignoreUrlsConfig; |
11 | private final RestfulAccessDeniedHandler restfulAccessDeniedHandler; |
12 | private final RestAuthenticationEntryPoint restAuthenticationEntryPoint; |
13 | private final IgnoreUrlsRemoveJwtFilter ignoreUrlsRemoveJwtFilter; |
14 | |
15 | |
16 | public SecurityWebFilterChain springSecurityFilterChain(ServerHttpSecurity http) { |
17 | http.oauth2ResourceServer().jwt() |
18 | .jwtAuthenticationConverter(jwtAuthenticationConverter()); |
19 | //自定义处理JWT请求头过期或签名错误的结果 |
20 | http.oauth2ResourceServer().authenticationEntryPoint(restAuthenticationEntryPoint); |
21 | //对白名单路径,直接移除JWT请求头 |
22 | http.addFilterBefore(ignoreUrlsRemoveJwtFilter, SecurityWebFiltersOrder.AUTHENTICATION); |
23 | http.authorizeExchange() |
24 | .pathMatchers(ArrayUtil.toArray(ignoreUrlsConfig.getUrls(),String.class)).permitAll()//白名单配置 |
25 | .anyExchange().access(authorizationManager)//鉴权管理器配置 |
26 | .and().exceptionHandling() |
27 | .accessDeniedHandler(restfulAccessDeniedHandler)//处理未授权 |
28 | .authenticationEntryPoint(restAuthenticationEntryPoint)//处理未认证 |
29 | .and().csrf().disable(); |
30 | return http.build(); |
31 | } |
32 | |
33 | |
34 | public Converter<Jwt, ? extends Mono<? extends AbstractAuthenticationToken>> jwtAuthenticationConverter() { |
35 | JwtGrantedAuthoritiesConverter jwtGrantedAuthoritiesConverter = new JwtGrantedAuthoritiesConverter(); |
36 | jwtGrantedAuthoritiesConverter.setAuthorityPrefix(AuthConstant.AUTHORITY_PREFIX); |
37 | jwtGrantedAuthoritiesConverter.setAuthoritiesClaimName(AuthConstant.AUTHORITY_CLAIM_NAME); |
38 | JwtAuthenticationConverter jwtAuthenticationConverter = new JwtAuthenticationConverter(); |
39 | jwtAuthenticationConverter.setJwtGrantedAuthoritiesConverter(jwtGrantedAuthoritiesConverter); |
40 | return new ReactiveJwtAuthenticationConverterAdapter(jwtAuthenticationConverter); |
41 | } |
42 | } |
- 在
WebFluxSecurity中自定义鉴权操作需要实现ReactiveAuthorizationManager接口;
1 | |
2 | public class AuthorizationManager implements ReactiveAuthorizationManager<AuthorizationContext> { |
3 | |
4 | |
5 | private RedisTemplate<String,Object> redisTemplate; |
6 | |
7 | |
8 | public Mono<AuthorizationDecision> check(Mono<Authentication> authentication, AuthorizationContext authorizationContext) { |
9 | //从Redis中获取当前路径可访问角色列表 |
10 | URI uri = authorizationContext.getExchange().getRequest().getURI(); |
11 | Object obj = redisTemplate.opsForHash().get(RedisConstant.RESOURCE_ROLES_MAP, uri.getPath()); |
12 | List<String> authorities = Convert.toList(String.class,obj); |
13 | authorities = authorities.stream().map(i -> i = AuthConstant.AUTHORITY_PREFIX + i).collect(Collectors.toList()); |
14 | //认证通过且角色匹配的用户可访问当前路径 |
15 | return authentication |
16 | .filter(Authentication::isAuthenticated) |
17 | .flatMapIterable(Authentication::getAuthorities) |
18 | .map(GrantedAuthority::getAuthority) |
19 | .any(authorities::contains) |
20 | .map(AuthorizationDecision::new) |
21 | .defaultIfEmpty(new AuthorizationDecision(false)); |
22 | } |
23 | } |
- 这里我们还需要实现一个全局过滤器
AuthGlobalFilter,当鉴权通过后将JWT令牌中的用户信息解析出来,然后存入请求的Header中,这样后续服务就不需要解析JWT令牌了,可以直接从请求的Header中获取到用户信息。
1 | |
2 | 4j |
3 | public class AuthGlobalFilter implements GlobalFilter, Ordered { |
4 | |
5 | public Mono<Void> filter(ServerWebExchange exchange, GatewayFilterChain chain) { |
6 | String token = exchange.getRequest().getHeaders().getFirst("Authorization"); |
7 | if (StrUtil.isEmpty(token)) { |
8 | return chain.filter(exchange); |
9 | } |
10 | try { |
11 | //从token中解析用户信息并设置到Header中去 |
12 | String realToken = token.replace("Bearer ", ""); |
13 | JWSObject jwsObject = JWSObject.parse(realToken); |
14 | String userStr = jwsObject.getPayload().toString(); |
15 | log.info("AuthGlobalFilter.filter() user:{}",userStr); |
16 | ServerHttpRequest request = exchange.getRequest().mutate().header("user", userStr).build(); |
17 | exchange = exchange.mutate().request(request).build(); |
18 | } catch (ParseException e) { |
19 | log.error("解析token 异常。", e); |
20 | } |
21 | return chain.filter(exchange); |
22 | } |
23 | |
24 | |
25 | public int getOrder() { |
26 | return 0; |
27 | } |
28 | } |
踩坑说明:
- 报错信息:
1 | Parameter 0 of method setSecurityWebFilterChains in org.springframework.security.config.annotation.web.reactive.WebFluxSecurityConfiguration required a bean of type 'org.springframework.security.oauth2.jwt.ReactiveJwtDecoder' that could not be found. |
2 | Action: |
3 | Consider defining a bean of type 'org.springframework.security.oauth2.jwt.ReactiveJwtDecoder' in your configuration. |
问题原因:是 gateway 的服务中gateway 与 spring-boot-starter-web包冲突,不能包含 spring-boot-starter-web 包:
1 | <dependency> |
2 | <groupId>org.springframework.boot</groupId> |
3 | <artifactId>spring-boot-starter-web</artifactId> |
4 | </dependency> |
将 其依赖去掉之后,问题解决。
micro-oauth2-api
最后我们搭建一个API服务,它不会集成和实现任何安全相关逻辑,全靠网关来保护它。
- 在
pom.xml中添加相关依赖,就添加了一个web依赖;
1 | <dependencies> |
2 | <dependency> |
3 | <groupId>org.springframework.boot</groupId> |
4 | <artifactId>spring-boot-starter-web</artifactId> |
5 | </dependency> |
6 | </dependencies> |
- 在
application.yml添加相关配置,很常规的配置;
1 | server: |
2 | port: 9501 |
3 | spring: |
4 | profiles: |
5 | active: dev |
6 | application: |
7 | name: micro-oauth2-api |
8 | cloud: |
9 | nacos: |
10 | discovery: |
11 | server-addr: localhost:8848 |
12 | management: |
13 | endpoints: |
14 | web: |
15 | exposure: |
16 | include: "*" |
- 创建一个测试接口,网关验证通过即可访问;
1 | /** |
2 | * 测试接口 |
3 | */ |
4 | |
5 | public class HelloController { |
6 | |
7 | ("/hello") |
8 | public String hello() { |
9 | return "Hello World."; |
10 | } |
11 | |
12 | } |
- 创建一个
LoginUserHolder组件,用于从请求的Header中直接获取登录用户信息;
1 | |
2 | public class LoginUserHolder { |
3 | |
4 | public UserDTO getCurrentUser(){ |
5 | //从Header中获取用户信息 |
6 | ServletRequestAttributes servletRequestAttributes = (ServletRequestAttributes) RequestContextHolder.getRequestAttributes(); |
7 | HttpServletRequest request = servletRequestAttributes.getRequest(); |
8 | String userStr = request.getHeader("user"); |
9 | JSONObject userJsonObject = new JSONObject(userStr); |
10 | UserDTO userDTO = new UserDTO(); |
11 | userDTO.setUsername(userJsonObject.getStr("user_name")); |
12 | userDTO.setId(Convert.toLong(userJsonObject.get("id"))); |
13 | userDTO.setRoles(Convert.toList(String.class,userJsonObject.get("authorities"))); |
14 | return userDTO; |
15 | } |
16 | } |
- 创建一个获取当前用户信息的接口。
1 | |
2 | ("/user") |
3 | public class UserController { |
4 | |
5 | private LoginUserHolder loginUserHolder; |
6 | |
7 | ("/currentUser") |
8 | public UserDTO currentUser() { |
9 | return loginUserHolder.getCurrentUser(); |
10 | } |
11 | } |
功能演示
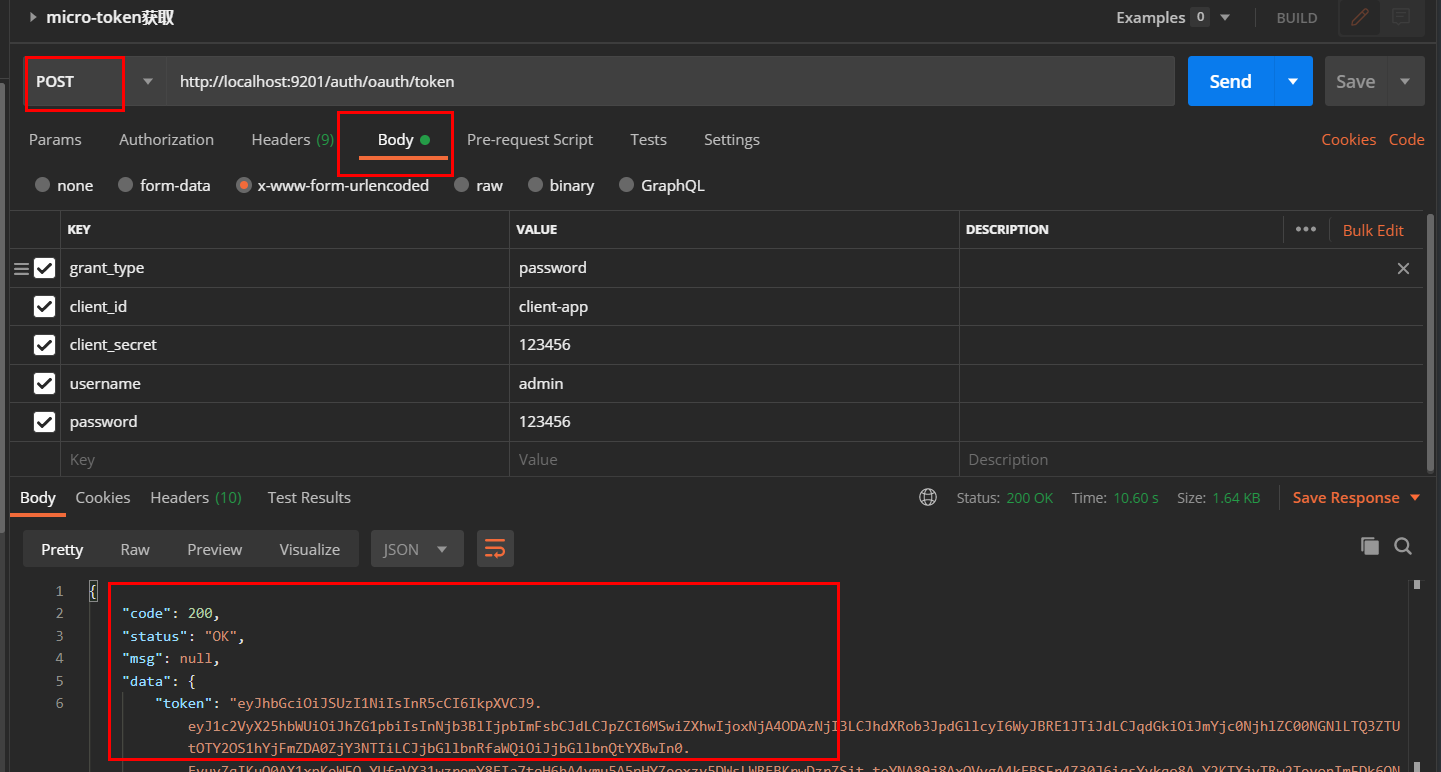
在此之前先启动我们的Nacos和Redis服务,然后依次启动
micro-oauth2-auth、micro-oauth2-gateway及micro-oauth2-api服务;使用密码模式获取JWT令牌,访问地址:http://localhost:9201/auth/oauth/token。**注意请求方式:post**
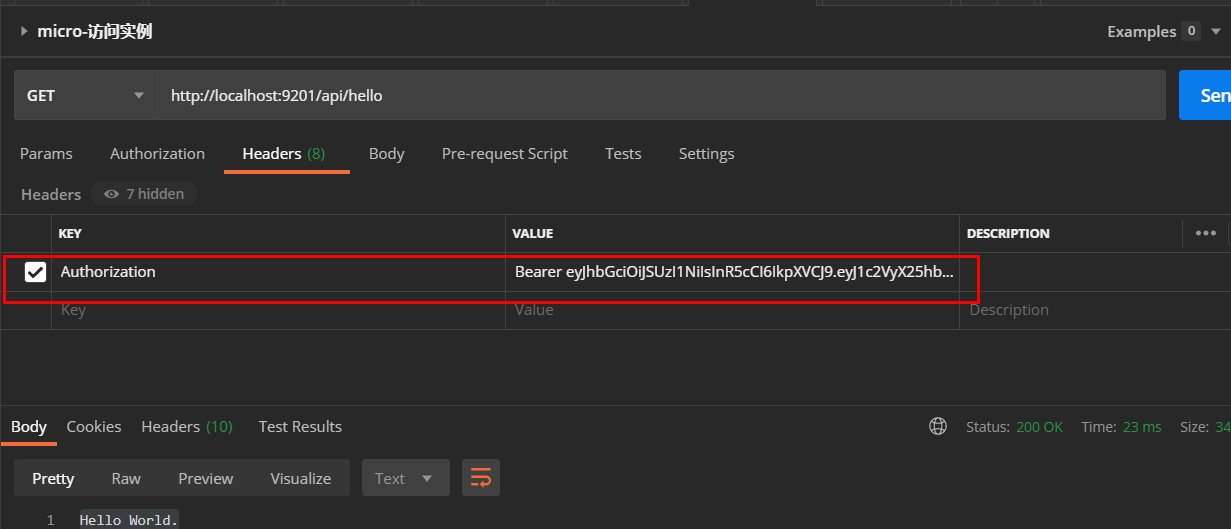
- 使用获取到的JWT令牌访问需要权限的接口,访问地址:http://localhost:9201/api/hello
1 | Authorization: Bearer xxxxxxxxxxxx |
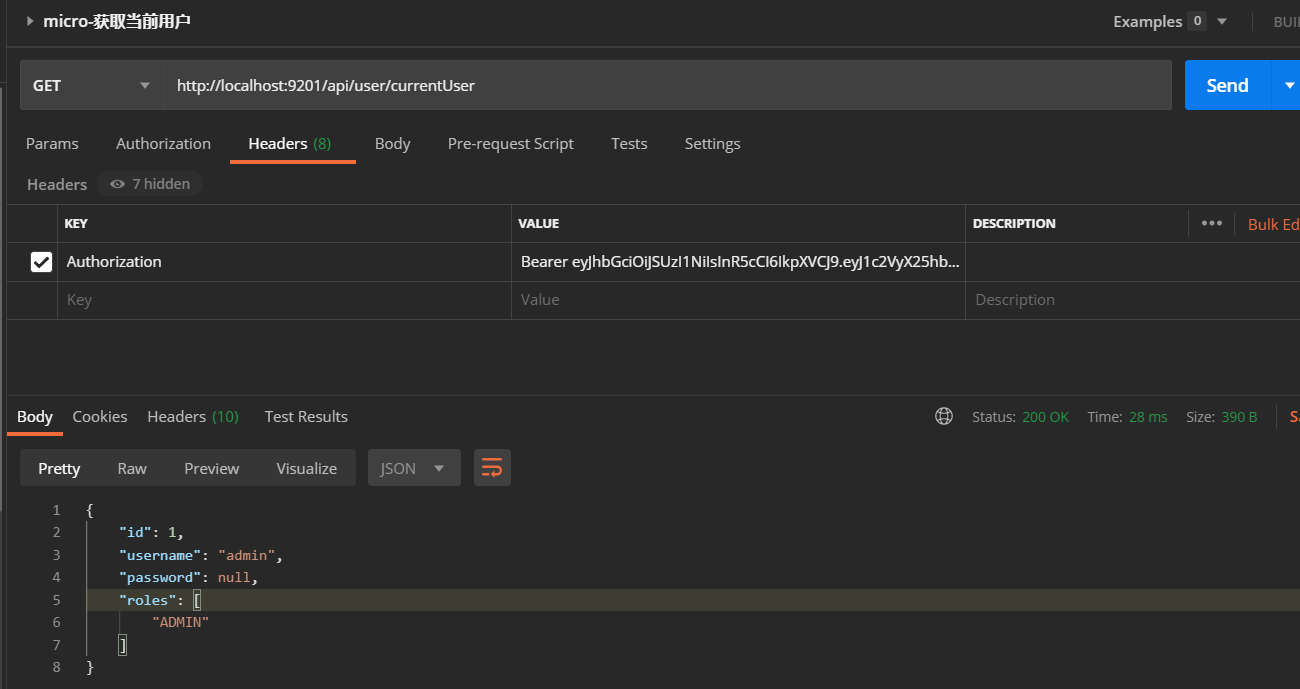
- 使用获取到的JWT令牌访问获取当前登录用户信息的接口,访问地址:http://localhost:9201/api/user/currentUser
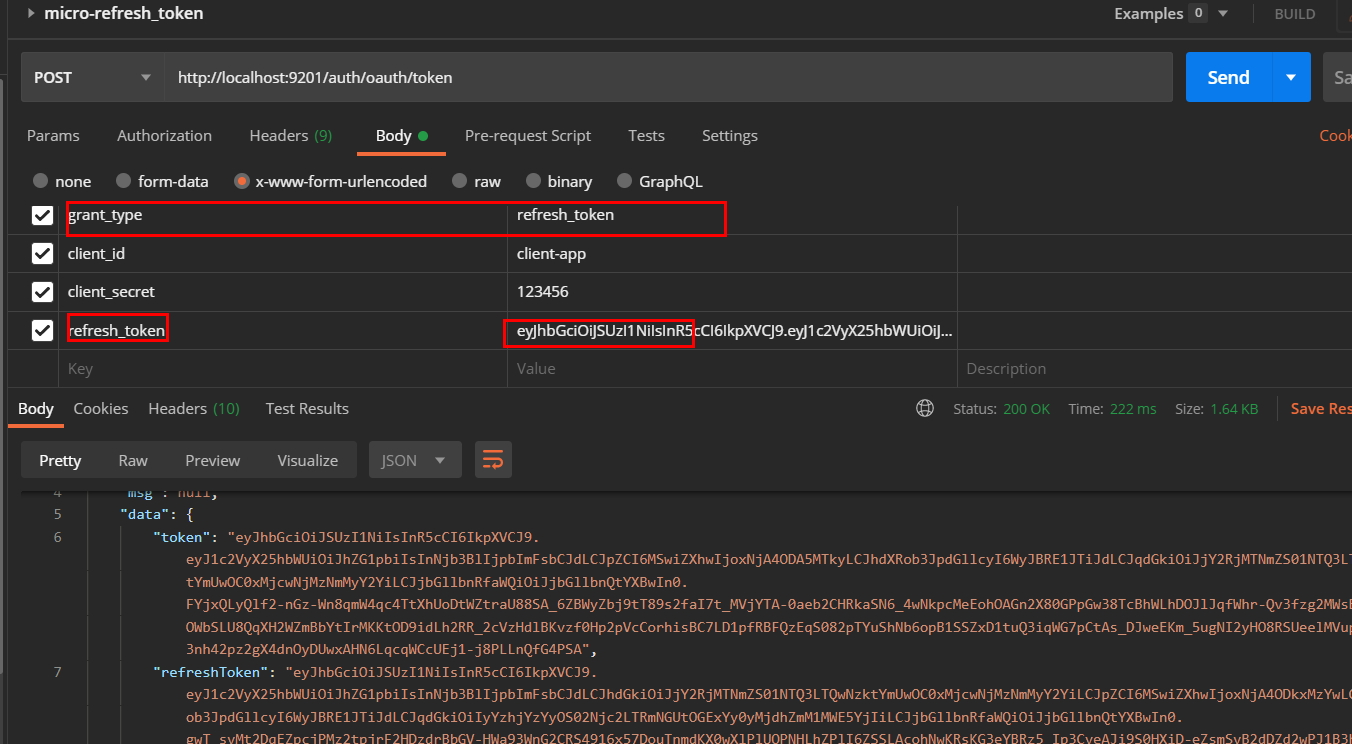
- 当JWT令牌过期时,使用refresh_token获取新的JWT令牌,访问地址:http://localhost:9201/auth/oauth/token
请求方式:post
请求参数:(注意 refresh_token: 后边没有 Bearer )
1 | grant_type:refresh_token |
2 | client_id:client-app |
3 | client_secret:123456 |
4 | refresh_token:eyJhbGciOiJSUzI1NiIsInR5cCI6IkpXVCJ9.eyJ1c2VyX25hbWUiOiJhZG1pbiIsInNjb3BlIjpbImFsbCJdLCJhdGkiOiIyOTJiNzhmZS05Njk5LTQxOWMtYjJiYy1mNWE0ZTU0MWM4MjciLCJpZCI6MSwiZXhwIjoxNjA4ODkxMzYwLCJhdXRob3JpdGllcyI6WyJBRE1JTiJdLCJqdGkiOiIyYzhjYzYyOS02Njc2LTRmNGUtOGExYy0yMjdhZmM1MWE5YjIiLCJjbGllbnRfaWQiOiJjbGllbnQtYXBwIn0.kMDRSxX7L50sxncZIk-uezin2QlNScdO6LE8FPULXH0ceynEnHTf4AWIflK8CLVK6SSRd6dEdP_Q2ZjWJS2dldfQwfP71ajOKJKwTMnzIFZsW-RExQLqaysXH1RUv5-gOLHiV8F5YYyFVRl45qBT8gPo8Hsxt72ZLl-wdGyQ0gGa5s8SIuYO3UxgzZ6OFKryPolWuHdM6LeXdis3KyoCzu2hno6Pm4-fg8p1JmU9ddsXw3F5iKz2z5u5YkoHgBT-g2us1bVS3hgEpqfmoYQ5c7oOG3SDSUSvNSQzZZro1fsHN1fLyLv1ZM0wbzCOBxkXMwoQD9TGj6FgvJRm_n-kyw |
- 使用没有访问权限的
test账号登录,访问接口时会返回如下信息,访问地址:http://localhost:9201/api/hello
使用到的模块
1 | ZBCN-SERVER |
2 | ├── zbcn-nacos/lib/nacos-server-1.4.0.zip -- 注册监控主服务 |
3 | ├── zbcn-micro/ micro-oauth2-api -- 模拟业务服务 |
4 | ├── zbcn-micro/ micro-oauth2-gateway -- 网关服务 |
5 | └── zbcn-micro/micro-oauth2-auth -- 权限校验 |