
如需转载,请根据 知识共享署名-非商业性使用-相同方式共享 4.0 国际许可协议 许可,附上本文作者及链接。
本文作者: 执笔成念
作者昵称: zbcn
本文链接: https://1363653611.github.io/zbcn.github.io/2021/01/19/springcloud19-Ali-Seata/
使用Seata彻底解决Spring Cloud中的分布式事务问题!
Seata是Alibaba开源的一款分布式事务解决方案,致力于提供高性能和简单易用的分布式事务服务,本文将通过一个简单的下单业务场景来对其用法进行详细介绍。
什么是分布式事务问题?
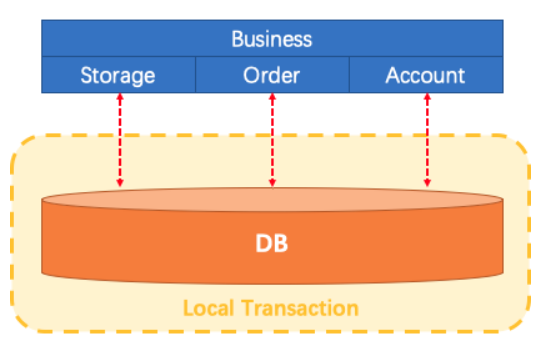
单体应用
单体应用中,一个业务操作需要调用三个模块完成,此时数据的一致性由本地事务来保证。
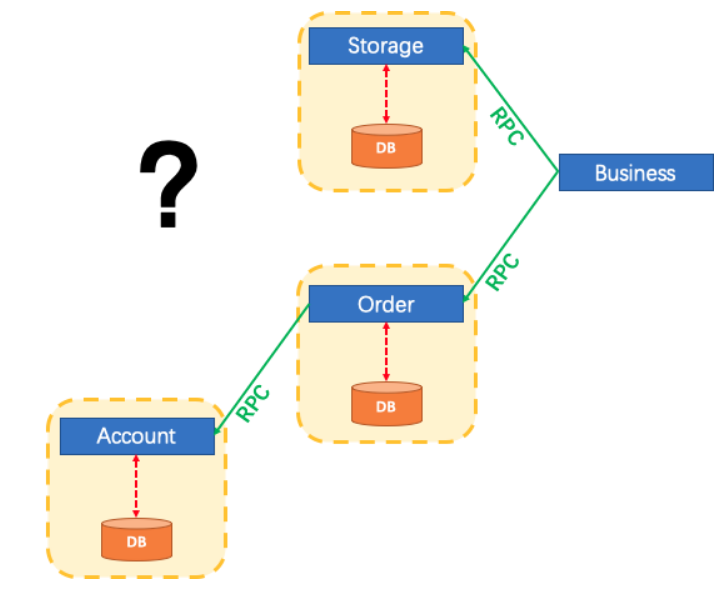
微服务应用
随着业务需求的变化,单体应用被拆分成微服务应用,原来的三个模块被拆分成三个独立的应用,分别使用独立的数据源,业务操作需要调用三个服务来完成。此时每个服务内部的数据一致性由本地事务来保证,但是全局的数据一致性问题没法保证。
小结
在微服务架构中由于全局数据一致性没法保证产生的问题就是分布式事务问题。简单来说,一次业务操作需要操作多个数据源或需要进行远程调用,就会产生分布式事务问题。
Seata简介
Seata 是一款开源的分布式事务解决方案,致力于提供高性能和简单易用的分布式事务服务。Seata 将为用户提供了 AT、TCC、SAGA 和 XA 事务模式,为用户打造一站式的分布式解决方案。
Seata原理和设计
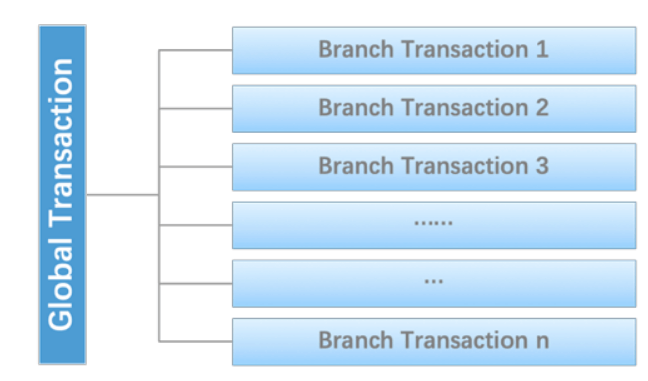
定义一个分布式事务
我们可以把一个分布式事务理解成一个包含了若干分支事务的全局事务,全局事务的职责是协调其下管辖的分支事务达成一致,要么一起成功提交,要么一起失败回滚。此外,通常分支事务本身就是一个满足ACID的本地事务。这是我们对分布式事务结构的基本认识,与 XA 是一致的。
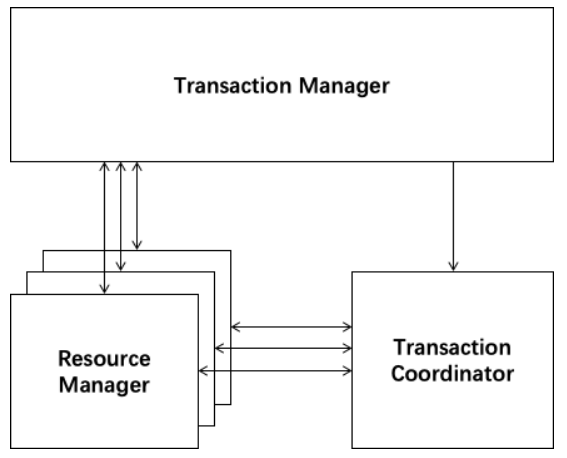
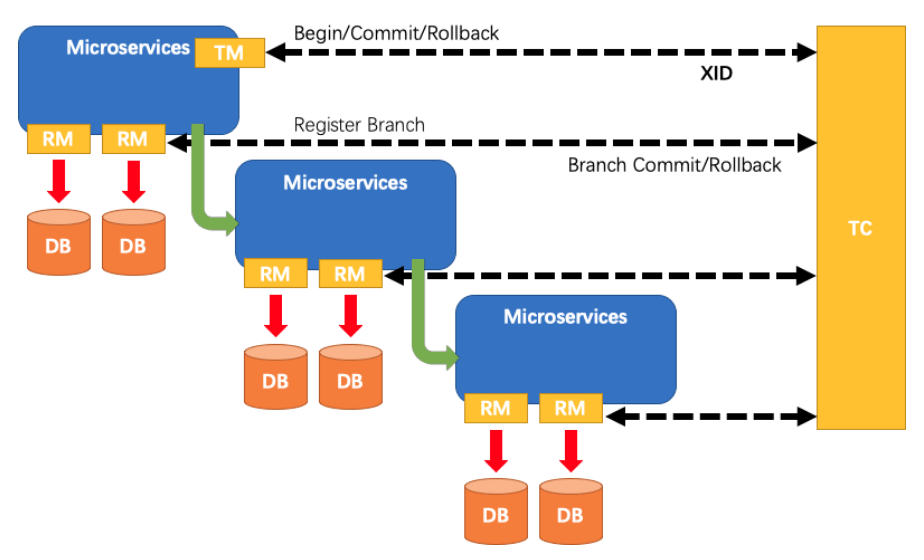
协议分布式事务处理过程的三个组件
- Transaction Coordinator (TC): 事务协调器,维护全局事务的运行状态,负责协调并驱动全局事务的提交或回滚;
- Transaction Manager (TM): 控制全局事务的边界,负责开启一个全局事务,并最终发起全局提交或全局回滚的决议;
- Resource Manager (RM): 控制分支事务,负责分支注册、状态汇报,并接收事务协调器的指令,驱动分支(本地)事务的提交和回滚。
一个典型的分布式事务过程
- TM 向 TC 申请开启一个全局事务,全局事务创建成功并生成一个全局唯一的 XID;
- XID 在微服务调用链路的上下文中传播;
- RM 向 TC 注册分支事务,将其纳入 XID 对应全局事务的管辖;
- TM 向 TC 发起针对 XID 的全局提交或回滚决议;
- TC 调度 XID 下管辖的全部分支事务完成提交或回滚请求。
启动 nacos
这里我们使用Nacos作为注册中心,Nacos的安装及使用可以参考:springcloud17-Ali-nacos
- 启动 nacos
startup.cmd -m standalone
seata-server的安装与配置
我们先从官网下载seata-server,这里下载的是seata-server-1.4.0.zip,下载地址:https://github.com/seata/seata/releases
解压seata-server安装包到指定目录,
修改 register.conf 文件
https://github.com/seata/seata/blob/develop/script/server/config/registry.conf
- 指明注册中心
1 | registry { |
2 | # file,nacos,eureka,redis,zk,consul,etcd3,sofa |
3 | type = "nacos" # 选择注册中心 |
4 | loadBalance = "RandomLoadBalance" |
5 | loadBalanceVirtualNodes = 10 |
6 | |
7 | nacos { |
8 | application = "seata-server" |
9 | serverAddr = "127.0.0.1:8848" #改为nacos的连接地址 |
10 | group = "SEATA_GROUP" |
11 | namespace = "" |
12 | cluster = "default" |
13 | username = "" |
14 | password = "" |
15 | } |
16 | eureka { |
17 | serviceUrl = "http://localhost:8761/eureka" |
18 | application = "default" |
19 | weight = "1" |
20 | } |
21 | redis { |
22 | serverAddr = "localhost:6379" |
23 | db = 0 |
24 | password = "" |
25 | cluster = "default" |
26 | timeout = 0 |
27 | } |
28 | zk { |
29 | cluster = "default" |
30 | serverAddr = "127.0.0.1:2181" |
31 | sessionTimeout = 6000 |
32 | connectTimeout = 2000 |
33 | username = "" |
34 | password = "" |
35 | } |
36 | consul { |
37 | cluster = "default" |
38 | serverAddr = "127.0.0.1:8500" |
39 | } |
40 | etcd3 { |
41 | cluster = "default" |
42 | serverAddr = "http://localhost:2379" |
43 | } |
44 | sofa { |
45 | serverAddr = "127.0.0.1:9603" |
46 | application = "default" |
47 | region = "DEFAULT_ZONE" |
48 | datacenter = "DefaultDataCenter" |
49 | cluster = "default" |
50 | group = "SEATA_GROUP" |
51 | addressWaitTime = "3000" |
52 | } |
53 | file { |
54 | name = "file.conf" |
55 | } |
56 | } |
- 配置中心选择1(选择 file)
1 | config { |
2 | # file、nacos 、apollo、zk、consul、etcd3 |
3 | type = "file" # 选择配置类型 |
4 | |
5 | nacos { |
6 | serverAddr = "127.0.0.1:8848" |
7 | namespace = "" |
8 | group = "SEATA_GROUP" |
9 | username = "" |
10 | password = "" |
11 | } |
12 | consul { |
13 | serverAddr = "127.0.0.1:8500" |
14 | } |
15 | apollo { |
16 | appId = "seata-server" |
17 | apolloMeta = "http://192.168.1.204:8801" |
18 | namespace = "application" |
19 | apolloAccesskeySecret = "" |
20 | } |
21 | zk { |
22 | serverAddr = "127.0.0.1:2181" |
23 | sessionTimeout = 6000 |
24 | connectTimeout = 2000 |
25 | username = "" |
26 | password = "" |
27 | } |
28 | etcd3 { |
29 | serverAddr = "http://localhost:2379" |
30 | } |
31 | file { |
32 | name = "file.conf" |
33 | } |
34 | } |
说明:
如果 选择为 file ,则启用 本地的 同目录的file.conf 文件的配置
如果启用 nacos,则需要 将配置导入 nacos 中
修改conf目录下的file.conf配置文件息(registery.conf 中config.type = ‘file’)
从 https://github.com/seata/seata/tree/develop/script/server/config 复制 文件内容
- 修改 store 存储模式(我们修改为mysql 的方式存储)
1 | ## transaction log store, only used in seata-server |
2 | store { |
3 | ## store mode: file、db、redis |
4 | mode = "db" # 修改存储模式,选择为数据库 |
5 | |
6 | ## file store property |
7 | file { |
8 | ## store location dir |
9 | dir = "sessionStore" |
10 | # branch session size , if exceeded first try compress lockkey, still exceeded throws exceptions |
11 | maxBranchSessionSize = 16384 |
12 | # globe session size , if exceeded throws exceptions |
13 | maxGlobalSessionSize = 512 |
14 | # file buffer size , if exceeded allocate new buffer |
15 | fileWriteBufferCacheSize = 16384 |
16 | # when recover batch read size |
17 | sessionReloadReadSize = 100 |
18 | # async, sync |
19 | flushDiskMode = async |
20 | } |
21 | |
22 | ## database store property |
23 | db { |
24 | ## the implement of javax.sql.DataSource, such as DruidDataSource(druid)/BasicDataSource(dbcp) etc. |
25 | datasource = "druid" # 数据源 |
26 | ## mysql/oracle/h2/oceanbase etc. |
27 | dbType = "mysql" # 数据库类型 |
28 | driverClassName = "com.mysql.cj.jdbc.Driver" |
29 | url = "jdbc:mysql://localhost:3306/seat-server?serverTimezone=UTC&useUnicode=true&characterEncoding=utf-8" |
30 | user = "root" |
31 | password = "123456" |
32 | minConn = 1 |
33 | maxConn = 10 |
34 | globalTable = "global_table" |
35 | branchTable = "branch_table" |
36 | lockTable = "lock_table" |
37 | queryLimit = 100 |
38 | } |
39 | |
40 | ## redis store property |
41 | redis { |
42 | host = "127.0.0.1" |
43 | port = "6379" |
44 | password = "" |
45 | database = "0" |
46 | minConn = 1 |
47 | maxConn = 10 |
48 | queryLimit = 100 |
49 | } |
50 | |
51 | } |
52 | |
53 | service { |
54 | #transaction service group mapping |
55 | = "default" #修改事务组名称为:fsp_tx_group,和客户端自定义的名称对应 |
56 | #only support when registry.type=file, please don't set multiple addresses |
57 | = "127.0.0.1:8091" |
58 | #degrade, current not support |
59 | enableDegrade = false |
60 | #disable seata |
61 | disableGlobalTransaction = false |
62 | } |
- 由于我们使用了db模式存储事务日志,所以我们需要创建一个seat-server数据库,建表sql在seata-server的
/lib/script/server.sql中;
使用nacos 的配置中心
从 官网的提交配置中心script(config-center) 中下载 config.txt 文件(本地位置:/lib/script/config-center)。然后修改对应配置。
使用 官网提供的脚本,将 配置批量导入 nacos 配置中心。
- 下载 config.txt:https://github.com/seata/seata/tree/develop/script/config-center/config.txt
- 下载 配置导入脚本:https://github.com/seata/seata/tree/develop/script/config-center/nacos
- 我们使用python 来导入:
python nacos-config.py localhost:8848 - 导入成功后在配置列表可看到相关信息
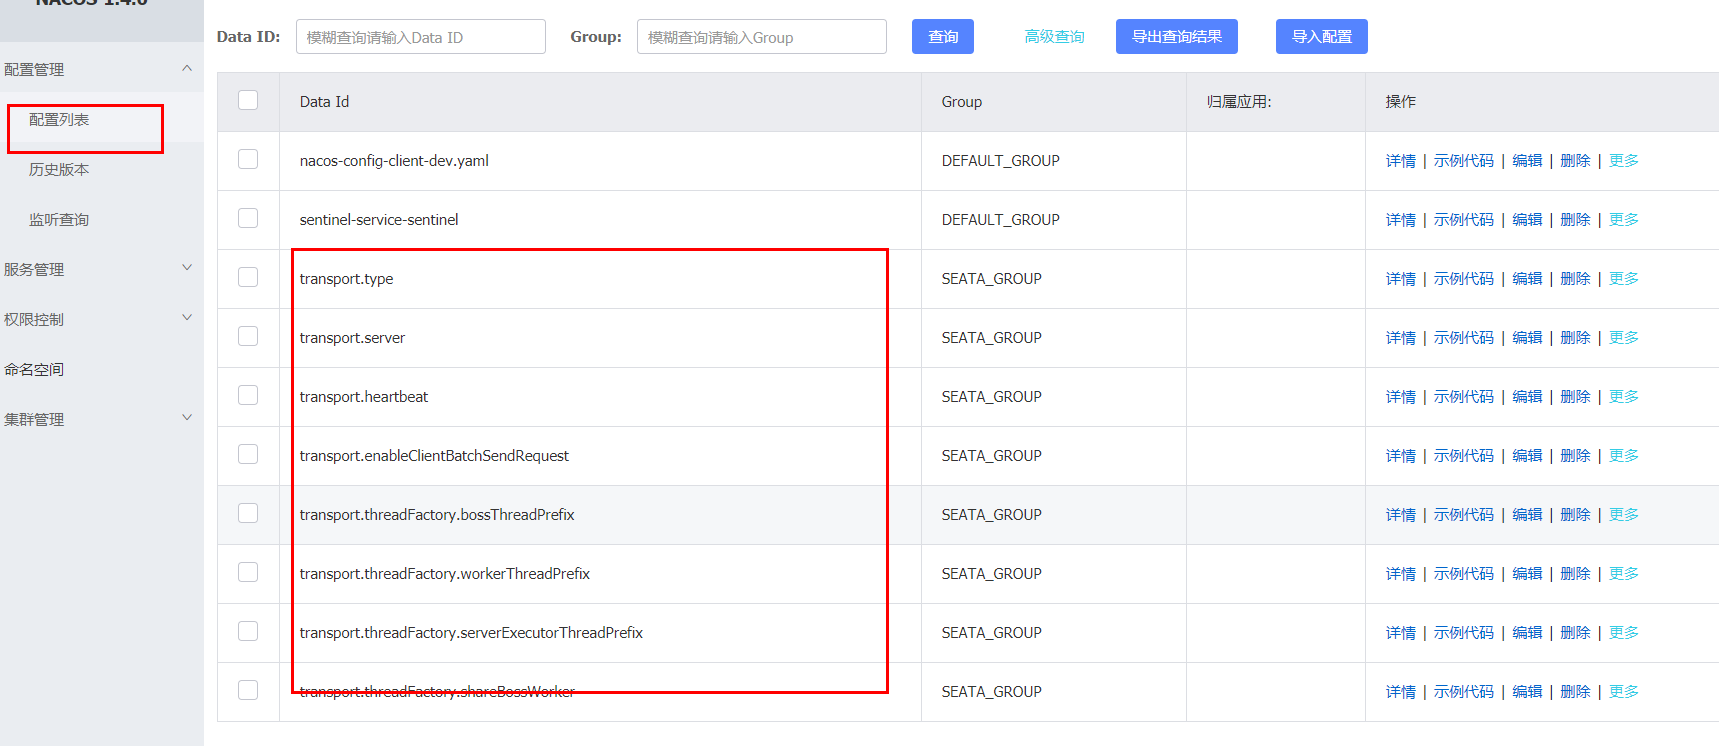
- 则 seata-server 使用了 配置中心的数据来启动
启动 seata-server
使用seata-server中/bin/seata-server.bat文件启动seata-server
注意:
- 启动 seata-server 前,如果使用 数据库模式,启动前先 将 jdbc 包下的数据库链接驱动依据实际数据库的版本选择对应的,然后移动到lib 下面。
数据库准备
创建业务数据库
- seat-order:存储订单的数据库;
- seat-storage:存储库存的数据库;
- seat-account:存储账户信息的数据库。
初始化业务表
order表
1 | CREATE TABLE `order` ( |
2 | `id` bigint(11) NOT NULL AUTO_INCREMENT, |
3 | `user_id` bigint(11) DEFAULT NULL COMMENT '用户id', |
4 | `product_id` bigint(11) DEFAULT NULL COMMENT '产品id', |
5 | `count` int(11) DEFAULT NULL COMMENT '数量', |
6 | `money` decimal(11,0) DEFAULT NULL COMMENT '金额', |
7 | PRIMARY KEY (`id`) |
8 | ) ENGINE=InnoDB AUTO_INCREMENT=7 DEFAULT CHARSET=utf8; |
9 | |
10 | ALTER TABLE `order` ADD COLUMN `status` int(1) DEFAULT NULL COMMENT '订单状态:0:创建中;1:已完结' AFTER `money` ; |
storage表
1 | CREATE TABLE `storage` ( |
2 | `id` bigint(11) NOT NULL AUTO_INCREMENT, |
3 | `product_id` bigint(11) DEFAULT NULL COMMENT '产品id', |
4 | `total` int(11) DEFAULT NULL COMMENT '总库存', |
5 | `used` int(11) DEFAULT NULL COMMENT '已用库存', |
6 | `residue` int(11) DEFAULT NULL COMMENT '剩余库存', |
7 | PRIMARY KEY (`id`) |
8 | ) ENGINE=InnoDB AUTO_INCREMENT=2 DEFAULT CHARSET=utf8; |
9 | |
10 | INSERT INTO `seat-storage`.`storage` (`id`, `product_id`, `total`, `used`, `residue`) VALUES ('1', '1', '100', '0', '100'); |
account表
1 | CREATE TABLE `account` ( |
2 | `id` bigint(11) NOT NULL AUTO_INCREMENT COMMENT 'id', |
3 | `user_id` bigint(11) DEFAULT NULL COMMENT '用户id', |
4 | `total` decimal(10,0) DEFAULT NULL COMMENT '总额度', |
5 | `used` decimal(10,0) DEFAULT NULL COMMENT '已用余额', |
6 | `residue` decimal(10,0) DEFAULT '0' COMMENT '剩余可用额度', |
7 | PRIMARY KEY (`id`) |
8 | ) ENGINE=InnoDB AUTO_INCREMENT=2 DEFAULT CHARSET=utf8; |
9 | |
10 | INSERT INTO `seat-account`.`account` (`id`, `user_id`, `total`, `used`, `residue`) VALUES ('1', '1', '1000', '0', '1000'); |
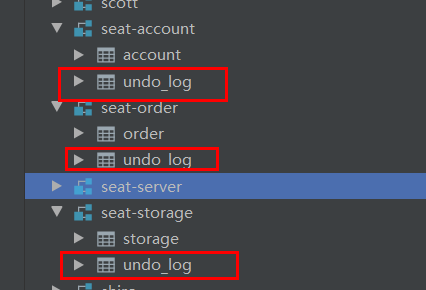
创建日志回滚表
使用Seata还需要在客户端每个数据库中创建日志表,建表sql在seata-server的/lib/script/undo_log.sql中
完整数据库示意图
制造一个分布式事务问题
这里我们会创建三个服务,一个订单服务,一个库存服务,一个账户服务。当用户下单时,会在订单服务中创建一个订单,然后通过远程调用库存服务来扣减下单商品的库存,再通过远程调用账户服务来扣减用户账户里面的余额,最后在订单服务中修改订单状态为已完成。该操作跨越三个数据库,有两次远程调用,很明显会有分布式事务问题。
客户端配置
对seata-order-service、seata-storage-service和seata-account-service三个seata的客户端进行配置,它们配置大致相同,我们下面以seata-order-service的配置为例;
引入相关jar包:
1 | |
2 | <!--nacos --> |
3 | <dependency> |
4 | <groupId>com.alibaba.cloud</groupId> |
5 | <artifactId>spring-cloud-starter-alibaba-nacos-discovery</artifactId> |
6 | </dependency> |
7 | |
8 | <!-- seata |
9 | 在 properties 属性中添加 |
10 | <seata.version>1.3.0</seata.version> |
11 | --> |
12 | <dependency> |
13 | <groupId>com.alibaba.cloud</groupId> |
14 | <artifactId>spring-cloud-starter-alibaba-seata</artifactId> |
15 | <exclusions> |
16 | <exclusion> |
17 | <groupId>io.seata</groupId> |
18 | <artifactId>seata-spring-boot-starter</artifactId> |
19 | </exclusion> |
20 | </exclusions> |
21 | </dependency> |
22 | <dependency> |
23 | <groupId>io.seata</groupId> |
24 | <artifactId>seata-spring-boot-starter</artifactId> |
25 | <version>${seata.version}</version> |
26 | </dependency> |
27 | |
28 | <!--数据源--> |
29 | <!--mysql-druid--> |
30 | <dependency> |
31 | <groupId>com.alibaba</groupId> |
32 | <artifactId>druid-spring-boot-starter</artifactId> |
33 | <version>1.1.10</version> |
34 | </dependency> |
35 | <dependency> |
36 | <groupId>org.mybatis.spring.boot</groupId> |
37 | <artifactId>mybatis-spring-boot-starter</artifactId> |
38 | <version>2.1.4</version> |
39 | </dependency> |
40 | |
41 | <dependency> |
42 | <groupId>mysql</groupId> |
43 | <artifactId>mysql-connector-java</artifactId> |
44 | <scope>runtime</scope> |
45 | </dependency> |
46 | <!--feign --> |
47 | <dependency> |
48 | <groupId>org.springframework.cloud</groupId> |
49 | <artifactId>spring-cloud-starter-openfeign</artifactId> |
50 | </dependency> |
application.yml 配置
添加数据源
1 | spring: |
2 | datasource: # 数据源配置 |
3 | driver-class-name: com.mysql.cj.jdbc.Driver |
4 | url: jdbc:mysql://localhost:3306/seat-account?serverTimezone=UTC&useUnicode=true&characterEncoding=utf-8 |
5 | password: 123456 |
6 | username: root |
添加 nacos 注册功能
1 | spring: |
2 | cloud: |
3 | nacos: |
4 | discovery: |
5 | server-addr: localhost:8848 #配置Nacos地址 |
6 | group: BUSINESS-GROUP |
修改application.yml文件,添加 seata 功能
1 | # 分布式事物 |
2 | seata: |
3 | enabled: true |
4 | application-id: seata-order-service |
5 | tx-service-group: fsp_tx_group |
6 | enable-auto-data-source-proxy: true |
7 | config: |
8 | type: nacos |
9 | nacos: |
10 | namespace: |
11 | serverAddr: 127.0.0.1:8848 |
12 | group: SEATA_GROUP |
13 | username: "nacos" |
14 | password: "nacos" |
15 | registry: |
16 | type: nacos |
17 | nacos: |
18 | application: seata-server |
19 | server-addr: 127.0.0.1:8848 |
20 | group: SEATA_GROUP |
21 | namespace: |
22 | username: "nacos" |
23 | password: "nacos" |
如果使用以上配置,则无需在项目中添加 registry.conf 和 file.conf
在项目的reources文件夹下 添加 registry.conf 和 file.conf文件(可选 )
如果不配置 seata 相关信息,则需要通过 文件的方式,则需要 配置如下信息
- 如果 在registry.conf 中 的
config.type = 'file', 则需要在 项目的 resources 文件夹中添加 file.conf - 如果 在registry.conf 中 的
config.type = 'nacos', 则使用nacos中的配置,则需要在 项目的 resources 文件夹中无需添加 file.conf
源配置文件路径: https://github.com/seata/seata/tree/develop/script/client/conf
- 添加并修改file.conf配置文件,主要是修改自定义事务组名称;
1 | service { |
2 | #vgroup->rgroup |
3 | = "default" #修改自定义事务组名称 |
4 | #only support single node |
5 | = "127.0.0.1:8091" |
6 | #degrade current not support |
7 | enableDegrade = false |
8 | #disable |
9 | disable = false |
10 | #unit ms,s,m,h,d represents milliseconds, seconds, minutes, hours, days, default permanent |
11 | = "-1" |
12 | = "-1" |
13 | disableGlobalTransaction = false |
14 | } |
- 添加并修改registry.conf配置文件,主要是将注册中心改为nacos;
1 | registry { |
2 | # file 、nacos 、eureka、redis、zk |
3 | type = "nacos" #修改为nacos |
4 | |
5 | nacos { |
6 | serverAddr = "localhost:8848" #修改为nacos的连接地址 |
7 | namespace = "" |
8 | cluster = "default" |
9 | } |
10 | } |
在启动类中取消数据源的自动创建:启用自定义的数据源
1 | (exclude = DataSourceAutoConfiguration.class) |
2 | @EnableDiscoveryClient |
3 | @EnableFeignClients |
4 | public class SeataOrderServiceApplication { |
5 | |
6 | public static void main(String[] args) { |
7 | SpringApplication.run(SeataOrderServiceApplication.class, args); |
8 | } |
9 | |
10 | } |
编写自定义数据源
1 | /** |
2 | * 使用Seata对数据源进行代理 |
3 | * <br/> |
4 | * @since 2020/12/21 13:41 |
5 | */ |
6 | |
7 | public class DataSourceProxyConfig { |
8 | |
9 | ("${mybatis.mapperLocations}") |
10 | private String mapperLocations; |
11 | |
12 | |
13 | (prefix = "spring.datasource") |
14 | public DataSource druidDataSource(){ |
15 | return new DruidDataSource(); |
16 | } |
17 | |
18 | |
19 | public DataSourceProxy dataSourceProxy(DataSource dataSource) { |
20 | return new DataSourceProxy(dataSource); |
21 | } |
22 | |
23 | |
24 | public SqlSessionFactory sqlSessionFactoryBean(DataSourceProxy dataSourceProxy) throws Exception { |
25 | SqlSessionFactoryBean sqlSessionFactoryBean = new SqlSessionFactoryBean(); |
26 | sqlSessionFactoryBean.setDataSource(dataSourceProxy); |
27 | sqlSessionFactoryBean.setMapperLocations(new PathMatchingResourcePatternResolver() |
28 | .getResources(mapperLocations)); |
29 | sqlSessionFactoryBean.setTransactionFactory(new SpringManagedTransactionFactory()); |
30 | return sqlSessionFactoryBean.getObject(); |
31 | } |
32 | } |
编写 申明式调用方法,完成微服务之间的调用
1 | (value = "seata-account-service") |
2 | public interface AccountService { |
3 | /** |
4 | * 扣减账户余额 |
5 | */ |
6 | ("/account/decrease") |
7 | ResponseResult decrease(@RequestParam("userId") Long userId, @RequestParam("money") BigDecimal money); |
8 | } |
9 | |
10 | (value = "seata-storage-service") |
11 | public interface StorageService { |
12 | /** |
13 | * 扣减库存 |
14 | */ |
15 | (value = "/storage/decrease") |
16 | ResponseResult decrease(@RequestParam("productId") Long productId, @RequestParam("count") Integer count); |
17 | } |
编写创建订单入口方法,并且在 方法上添加 @GlobalTransactional(name = "fsp-create-order",rollbackFor = Exception.class) 注解
1 | 4j |
2 | |
3 | public class OrderServiceImpl implements OrderService { |
4 | |
5 | |
6 | private OrderDao orderDao; |
7 | |
8 | private StorageService storageService; |
9 | |
10 | private AccountService accountService; |
11 | |
12 | /** |
13 | * 创建订单->调用库存服务扣减库存->调用账户服务扣减账户余额->修改订单状态 |
14 | */ |
15 | (name = "fsp-create-order",rollbackFor = Exception.class) |
16 | @Override |
17 | public void create(Order order) { |
18 | log.info("------->下单开始"); |
19 | //本应用创建订单 |
20 | orderDao.create(order); |
21 | |
22 | //远程调用库存服务扣减库存 |
23 | log.info("------->order-service中扣减库存开始"); |
24 | storageService.decrease(order.getProductId(),order.getCount()); |
25 | log.info("------->order-service中扣减库存结束"); |
26 | |
27 | //远程调用账户服务扣减余额 |
28 | log.info("------->order-service中扣减余额开始"); |
29 | accountService.decrease(order.getUserId(),order.getMoney()); |
30 | log.info("------->order-service中扣减余额结束"); |
31 | |
32 | //修改订单状态为已完成 |
33 | log.info("------->order-service中修改订单状态开始"); |
34 | orderDao.update(order.getUserId(),0); |
35 | log.info("------->order-service中修改订单状态结束"); |
36 | |
37 | log.info("------->下单结束"); |
38 | } |
39 | } |
编写 web 访问入口
1 | |
2 | (value = "/order") |
3 | public class OrderController { |
4 | |
5 | private OrderService orderService; |
6 | |
7 | /** |
8 | * 创建订单 |
9 | */ |
10 | ("/create") |
11 | public ResponseResult create(Order order) { |
12 | orderService.create(order); |
13 | return ResponseResult.success("订单创建成功!"); |
14 | } |
15 | } |
分别按照以上方式 创建 seate-storage-service 和 seata-account-service 服务
分布式事务功能演示
调用接口进行下单操作后查看数据库:http://localhost:8180/order/create?userId=1&productId=1&count=10&money=100
使用到的模块
1 | ZBCN-SERVER |
2 | ├── zbcn-nacos/lib/nacos-server-1.4.0.zip -- 注册监控主服务 |
3 | ├── zbcn-seata/lib/seata-1.4.0 -- 分布式事物服务 |
4 | ├── zbcn-seata/ seate-order-service -- 整合了seata的订单服务 |
5 | ├── zbcn-seata/ seate-storage-service -- 整合了seata的库存服务 |
6 | └── zbcn-seata/seata-account-service -- 整合了seata的账户服务 |