
如需转载,请根据 知识共享署名-非商业性使用-相同方式共享 4.0 国际许可协议 许可,附上本文作者及链接。
本文作者: 执笔成念
作者昵称: zbcn
本文链接: https://1363653611.github.io/zbcn.github.io/2021/01/07/springcloud-07ZUUL%20%E9%9B%86%E6%88%90/
zuul api 网关
其他
- 与服务治理框架结合
- 请求转发时的熔断机制
- 服务聚合
- 。。。。
整合方式
spring-zuul 与eureka 整合
将自身注册为eureka 的服务治理下的应用,同时从eureka 中 获取其他服务的实例信息。
维护服务实例的工作交给 eureka。
zuul 只负责路由规则的维护
zuul 默认会将通过服务名作为 contextPath 的方式来创建路由映射。
项目搭建
新建 zuul-gateway 项目
引入 maven依赖
1 | <!--注册eureka 客户端--> |
2 | <dependency> |
3 | <groupId>org.springframework.cloud</groupId> |
4 | <artifactId>spring-cloud-starter-netflix-eureka-client</artifactId> |
5 | </dependency> |
6 | <!--网关核心依赖--> |
7 | <dependency> |
8 | <groupId>org.springframework.cloud</groupId> |
9 | <artifactId>spring-cloud-starter-netflix-zuul</artifactId> |
10 | </dependency> |
11 | <!--添加actuator ,查看路由信息--> |
12 | <dependency> |
13 | <groupId>org.springframework.boot</groupId> |
14 | <artifactId>spring-boot-starter-actuator</artifactId> |
15 | </dependency> |
说明:
spring-cloud-starter-netflix-eureka-client用来将其整合 eureka。
在 配置文件中添加 注册 为 eureka 客户端的配置1eureka:2instance:3# hostname: demo.server # 主机名称4instance-id: zuul.server # eureka 服务列表显示名称5client:6register-with-eureka: true7fetch-registry: true8service-url:9defaultZone: http://localhost:8000/eureka/spring-cloud-starter-netflix-zuul用来集成 zuul 网关功能
在配置文件中添加遇到的坑:1zuul:2host:3connect-timeout-millis: 30004socket-timeout-millis: 30005routes: #给服务配置路由6# 这里可以自定义7demo-server:8# 匹配的路由规则: 表示以demo 开头的访问,都将进入 demo-server9path: /demo/**10# 路由的目标地址11#url: http://localhost:9000/12sericeId: demo-server # 路由的目标服务名
Load balancer does not have available server for client: xxx
原因是 sericeId 配置不对,此处配置的为服务 的名称。即:spring.application.name对应的名称访问路径 404:
原因:是对路由有误解、 path 对应的路径是用来寻找 指定服务的,即 通过:/demo/..就能找到对应的demo-server服务,而资源路径是全模式匹配
eg:访问:http://localhost:8080/demo/api-demo-url/index可以访问到 demo-server 服务下的/api-demo-url/index资源。spring-boot 和 spring-cloud 对应的版本问题。
spring-cloud 对应的 zuul-starter 名称修改问题
spring-boot-starter-actuator用来集成actuator 监控功能
配置文件中添加如下信息,可以监控路由信息通过url 路径:1#路由的端点2management:3endpoints:4web:5exposure:6include: 'routes'http://localhost:8080/actuator/routes可以查看路由信息
开启网关 @EnableZuulProxy
在启动类上添加@EnableZuulProxy注解来启用Zuul的API网关功能
1 | //启用Zuul的API网关功能 |
2 | |
3 | |
4 | public class ZuulGatewayApplication { |
5 | public static void main(String[] args) { |
6 | SpringApplication.run(ZuulGatewayApplication.class, args); |
7 | } |
8 | } |
默认路由规则
Zuul和Eureka结合使用,可以实现路由的自动配置,自动配置的路由以服务名称为匹配路径,相当于如下配置:
1 | zuul: |
2 | host: |
3 | connect-timeout-millis: 3000 |
4 | socket-timeout-millis: 3000 |
5 | routes: #给服务配置路由 |
6 | # 这里可以自定义 |
7 | demo-server: |
8 | # 匹配的路由规则: 表示以demo 开头的访问,都将进入 demo-server |
9 | path: /demo/** |
- 访问:
http://localhost:8080/demo/api-demo-url/index可以访问到 demo-server 服务下的/api-demo-url/index资源
负载均衡功能
如果有两个 demo-server 服务,多次调用http://localhost:8080/demo/api-demo-url/index,将会在两个服务之间切换调用
配置访问前缀
我们可以通过以下配置来给网关路径添加前缀,此处添加了/proxy前缀,
1 | zuul: |
2 | prefix: /proxy #给网关路由添加前缀 |
访问路径变更为:http://localhost:8080/proxy/demo/api-demo-url/index
Header过滤及重定向添加Host
- Zuul在请求路由时,默认会过滤掉一些敏感的头信息,以下配置可以防止路由时的Cookie及Authorization的丢失:
1zuul:2sensitive-headers: Cookie,Set-Cookie,Authorization #配置过滤敏感的请求头信息,设置为空就不会过滤 - Zuul在请求路由时,不会设置最初的host头信息,以下配置可以解决:
1zuul:2add-host-header: true #设置为true重定向是会添加host请求头
过滤器
路由与过滤是Zuul的两大核心功能,路由功springcloud
过滤器类型
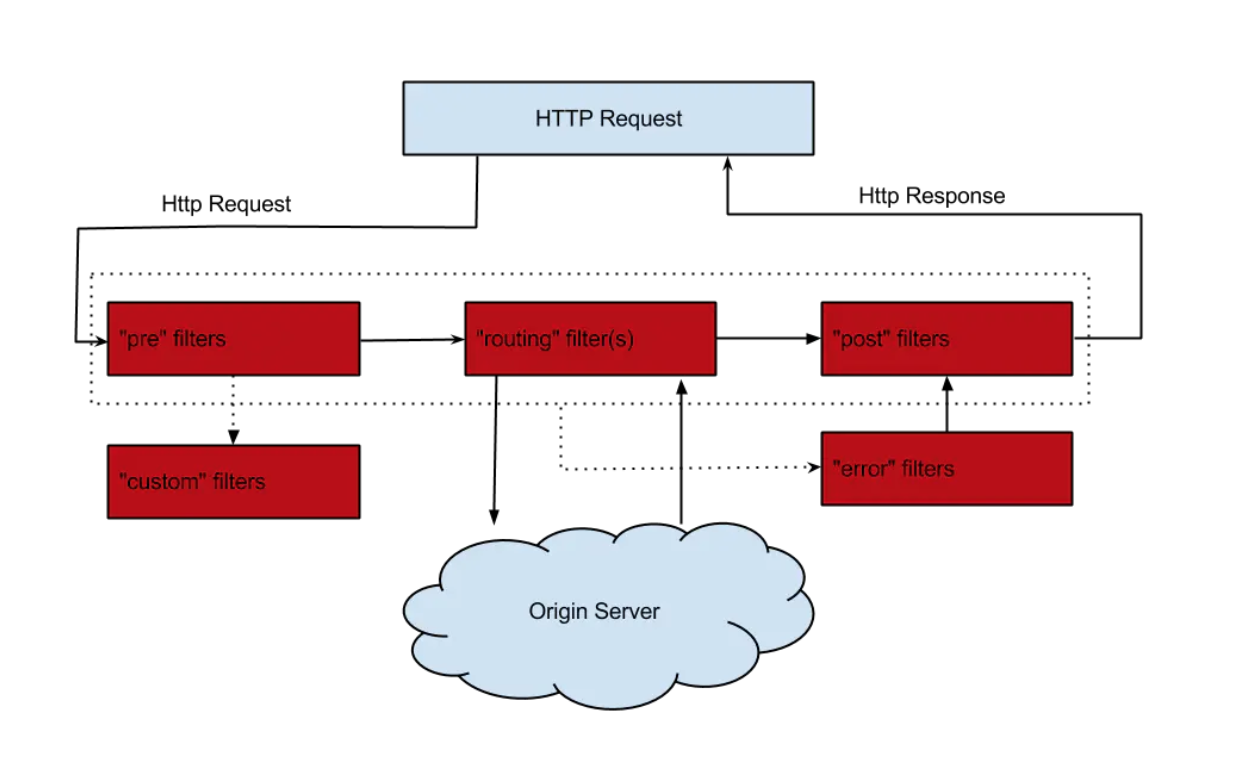
Zuul中有以下几种典型的过滤器类型。
- pre:在请求被路由到目标服务前执行,比如权限校验、打印日志等功能;
- routing:在请求被路由到目标服务时执行,这是使用Apache HttpClient或Netflix Ribbon构建和发送原始HTTP请求的地方;
- post:在请求被路由到目标服务后执行,比如给目标服务的响应添加头信息,收集统计数据等功能;
- error:请求在其他阶段发生错误时执行。
过滤器的生命周期
- 下图描述了一个HTTP请求到达API网关后,如何在各种不同类型的过滤器中流转的过程。
自定义过滤器
添加PreLogFilter类继承ZuulFilter
这是一个前置过滤器,用于在请求路由到目标服务前打印请求日志
1 | /** |
2 | * 日志记录过滤器 |
3 | */ |
4 | |
5 | public class PreLogFilter extends ZuulFilter { |
6 | private Logger log = LoggerFactory.getLogger(PreLogFilter.class); |
7 | |
8 | /** |
9 | * 过滤器类型,有pre、routing、post、error四种。 |
10 | * @return |
11 | */ |
12 | |
13 | public String filterType() { |
14 | return "pre"; |
15 | } |
16 | |
17 | /** |
18 | * 过滤器执行顺序,数值越小优先级越高。 |
19 | * @return |
20 | */ |
21 | |
22 | public int filterOrder() { |
23 | return 1; |
24 | } |
25 | |
26 | /** |
27 | * 是否进行过滤,返回true会执行过滤。 |
28 | * @return |
29 | */ |
30 | |
31 | public boolean shouldFilter() { |
32 | return true; |
33 | } |
34 | |
35 | /** |
36 | * 自定义的过滤器逻辑,当shouldFilter()返回true时会执行 |
37 | * @return |
38 | * @throws ZuulException |
39 | */ |
40 | |
41 | public Object run() throws ZuulException { |
42 | RequestContext requestContext = RequestContext.getCurrentContext(); |
43 | HttpServletRequest request = requestContext.getRequest(); |
44 | String host = request.getRemoteHost(); |
45 | String method = request.getMethod(); |
46 | String uri = request.getRequestURI(); |
47 | log.info("Remote host:{},method:{},uri:{}", host, method, uri); |
48 | return null; |
49 | } |
50 | } |
核心过滤器
| 过滤器名称 | 过滤类型 | 优先级 | 过滤器的作用 |
|---|---|---|---|
| ServletDetectionFilter | pre | -3 | 检测当前请求是通过DispatcherServlet处理运行的还是ZuulServlet运行处理的 |
| Servlet30WrapperFilter | pre | -2 | 对原始的HttpServletRequest进行包装 |
| FormBodyWrapperFilter | pre | -1 | 将Content-Type为application/x-www-form-urlencoded或multipart/form-data的请求包装成FormBodyRequestWrapper对象 |
| DebugFilter | route | 1 | 根据zuul.debug.request的配置来决定是否打印debug日志 |
| PreDecorationFilter | route | 5 | 对当前请求进行预处理以便执行后续操作 |
| RibbonRoutingFilter | route | 10 | 通过Ribbon和Hystrix来向服务实例发起请求,并将请求结果进行返回。 |
| SimpleHostRoutingFilter | route | 100 | 只对请求上下文中有routeHost参数的进行处理,直接使用HttpClient向routeHost对应的物理地址进行转发。 |
| SendForwardFilter | route | 500 | 只对请求上下文中有forward.to参数的进行处理,进行本地跳转。 |
| SendErrorFilter | post | 0 | 当其他过滤器内部发生异常时的会由它来进行处理,产生错误响应。 |
| SendResponseFilter | post | 1000 | 利用请求上下文的响应信息来组织请求成功的响应内容 |
禁用过滤器
- 我们可以对过滤器进行禁用的配置,配置格式如下:
1 | zuul: |
2 | filterClassName: |
3 | filter: |
4 | disable: true |
- 以下是禁用PreLogFilter的示例配置:
1 | zuul: |
2 | PreLogFilter: |
3 | pre: |
4 | disable: true |
Ribbon和Hystrix的支持
由于Zuul自动集成了Ribbon和Hystrix,所以Zuul天生就有负载均衡和服务容错能力,我们可以通过Ribbon和Hystrix的配置来配置Zuul中的相应功能。
- 可以使用Hystrix的配置来设置路由转发时HystrixCommand的执行超时时间:
1 | hystrix: |
2 | command: #用于控制HystrixCommand的行为 |
3 | default: |
4 | execution: |
5 | isolation: |
6 | thread: |
7 | timeoutInMilliseconds: 1000 #配置HystrixCommand执行的超时时间,执行超过该时间会进行服务降级处理 |
- 可以使用Ribbon的配置来设置路由转发时请求连接及处理的超时时间:
1 | ribbon: #全局配置 |
2 | ConnectTimeout: 1000 #服务请求连接超时时间(毫秒) |
3 | ReadTimeout: 3000 #服务请求处理超时时间(毫秒) |
常用的配置
1 | zuul: |
2 | routes: #给服务配置路由 |
3 | user-service: |
4 | path: /userService/** |
5 | feign-service: |
6 | path: /feignService/** |
7 | ignored-services: user-service,feign-service #关闭默认路由配置 |
8 | prefix: /proxy #给网关路由添加前缀 |
9 | sensitive-headers: Cookie,Set-Cookie,Authorization #配置过滤敏感的请求头信息,设置为空就不会过滤 |
10 | add-host-header: true #设置为true重定向是会添加host请求头 |
11 | retryable: true # 关闭重试机制 |
12 | PreLogFilter: |
13 | pre: |
14 | disable: false #控制是否启用过滤器 |
对应的项目
1 | ZBCN-SERVER |
2 | ├── zbcn-register/eureka-server -- eureka注册中心 |
3 | ├── zbcn-gateway/zuul-gateway -- zuul网关 |
4 | └── /zbcn-business/zbcn-demo-server -- 业务服务 |