
如需转载,请根据 知识共享署名-非商业性使用-相同方式共享 4.0 国际许可协议 许可,附上本文作者及链接。
本文作者: 执笔成念
作者昵称: zbcn
本文链接: https://1363653611.github.io/zbcn.github.io/2020/10/13/web_04%E9%A1%B9%E7%9B%AE%E7%BB%93%E6%9E%84/
项目结构
对一个Web应用程序来说,除了Servlet、Filter这些逻辑组件,还需要JSP这样的视图文件,外加一堆静态资源文件,如CSS、JS等。
合理组织文件结构非常重要。我们以一个具体的Web应用程序为例:
1 | webapp |
2 | ├── pom.xml |
3 | └── src |
4 | └── main |
5 | ├── java |
6 | │ └── com |
7 | │ └── itranswarp |
8 | │ └── learnjava |
9 | │ ├── Main.java |
10 | │ ├── filter |
11 | │ │ └── EncodingFilter.java |
12 | │ └── servlet |
13 | │ ├── FileServlet.java |
14 | │ └── HelloServlet.java |
15 | ├── resources |
16 | └── webapp |
17 | ├── WEB-INF |
18 | │ └── web.xml |
19 | ├── favicon.ico |
20 | └── static |
21 | └── bootstrap.css |
静态文件处理Servlet
我们把所有的静态资源文件放入/static/目录,在开发阶段,有些Web服务器会自动为我们加一个专门负责处理静态文件的Servlet,但如果IndexServlet映射路径为/,会屏蔽掉处理静态文件的Servlet映射。因此,我们需要自己编写一个处理静态文件的FileServlet:
1 | /** |
2 | * 处理静态文件的Servlet |
3 | * <br/> |
4 | * @author zbcn8 |
5 | * @since 2020/10/3 16:37 |
6 | */ |
7 | ("/static/*") |
8 | public class StaticServlet extends HttpServlet { |
9 | |
10 | |
11 | public void doGet(HttpServletRequest req, HttpServletResponse resp) throws IOException { |
12 | ServletContext ctx = req.getServletContext(); |
13 | // RequestURI包含ContextPath,需要去掉: |
14 | String urlPath = req.getRequestURI().substring(ctx.getContextPath().length()); |
15 | // 获取真实文件路径: |
16 | String filepath = ctx.getRealPath(urlPath); |
17 | if (filepath == null) { |
18 | // 无法获取到路径: |
19 | resp.sendError(HttpServletResponse.SC_NOT_FOUND); |
20 | return; |
21 | } |
22 | |
23 | Path path = Paths.get(filepath); |
24 | if (!path.toFile().isFile()) { |
25 | // 文件不存在: |
26 | resp.sendError(HttpServletResponse.SC_NOT_FOUND); |
27 | return; |
28 | } |
29 | |
30 | // 根据文件名猜测Content-Type: |
31 | String mime = Files.probeContentType(path); |
32 | if (mime == null) { |
33 | mime = "application/octet-stream"; |
34 | } |
35 | |
36 | resp.setContentType(mime); |
37 | // 读取文件并写入Response: |
38 | OutputStream output = resp.getOutputStream(); |
39 | try (InputStream input = new BufferedInputStream(new FileInputStream(filepath))) { |
40 | IOUtils.copy(input, output); |
41 | } |
42 | output.flush(); |
43 | } |
44 | } |
这样一来,在开发阶段,我们就可以方便地高效开发。
web 服务部署架构
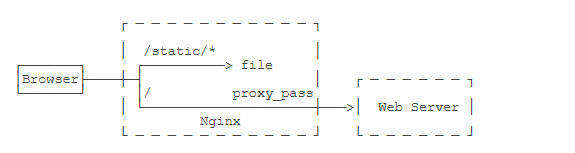
类似Tomcat这样的Web服务器,运行的Web应用程序通常都是业务系统,因此,这类服务器也被称为应用服务器。应用服务器并不擅长处理静态文件,也不适合直接暴露给用户。通常,我们在生产环境部署时,总是使用类似Nginx这样的服务器充当反向代理和静态服务器,只有动态请求才会放行给应用服务器,所以,部署架构如下:
实现上述功能的Nginx配置文件如下:
1 | server { |
2 | listen 80; |
3 | |
4 | server_name www.local.xxx.com |
5 | |
6 | # 静态文件根目录: |
7 | root /path/to/src/main/webapp; |
8 | |
9 | access_log /var/log/nginx/webapp_access_log; |
10 | error_log /var/log/nginx/webapp_error_log; |
11 | |
12 | # 处理静态文件请求: |
13 | location /static { |
14 | } |
15 | |
16 | # 处理静态文件请求: |
17 | location /favicon.ico { |
18 | } |
19 | |
20 | # 不允许请求/WEB-INF: |
21 | location /WEB-INF { |
22 | return 404; |
23 | } |
24 | |
25 | # 其他请求转发给Tomcat: |
26 | location / { |
27 | proxy_pass http://127.0.0.1:8080; |
28 | proxy_set_header Host $host; |
29 | proxy_set_header X-Real-IP $remote_addr; |
30 | proxy_set_header X-Forwarded-Proto $scheme; |
31 | proxy_set_header X-Forwarded-For $proxy_add_x_forwarded_for; |
32 | } |
33 | } |
使用Nginx配合Tomcat服务器,可以充分发挥Nginx作为网关的优势,既可以高效处理静态文件,也可以把https、防火墙、限速、反爬虫等功能放到Nginx中,使得我们自己的WebApp能专注于业务逻辑。
小结
部署Web应用程序时,要设计合理的目录结构,同时考虑开发模式需要便捷性,生产模式需要高性能。