
spring_06_容器扩展
- ApplicationContext 用于扩展BeanFactory现有的功能。相比于BeanFactory,ApplicationContext 提供了更多的扩展功能。因为ApplicationContext 包含了BeanFactory的所有功能,所以一般建议使用ApplicationContext。除非在一些限制场合,比如字节长度对内存有很大的影响(applet)。 绝大多数的企业应用中,就是要使用ApplicationContext, 才能完成更多的业务场景需求。
BeanFactory 的bean 在调用getBean 时才解析创建。 ApplicationContext 中的bean 在 new ApplicationContext(…) 时,加载。在构造方法内调用refresh() 方法时创建。
使用 BeanFactory 加载:
BeanFactory bf = new XmlBeanFactory(new ClassPathResource("beanFactoryText.xml"));使用 ApplicatioinContext 加载:
ApplicatioinContext bf = new ClassPathXmlApplicationContext("beanFactoryText.xml")一下用ClassPathXmlApplicationContext 为切入点进行分析:
1// 测试方法2public void testApplicationContext(){3ApplicationContext context = new ClassPathXmlApplicationContext("com.zbcn.test/BeanFactoryTest.xml");4Object test = context.getBean("test");5}6// 调用构造方法7public ClassPathXmlApplicationContext(String configLocation) throws BeansException {8this(new String[] {configLocation}, true, null);9}10//11public ClassPathXmlApplicationContext(12String[] configLocations, boolean refresh, @Nullable ApplicationContext parent)13throws BeansException {14super(parent);15//设置配置路径16setConfigLocations(configLocations);17if (refresh) {18// 解析功能的实现都在 refresh中19refresh();20}21}
设置配置路径
- ClassPathXmlApplicationContext 中支持多个配置文件以数组的形式传入:
1public void setConfigLocations(@Nullable String... locations) {2if (locations != null) {3Assert.noNullElements(locations, "Config locations must not be null");4this.configLocations = new String[locations.length];5for (int i = 0; i < locations.length; i++) {6// 解析指定路径,如果包含特殊符号,如:${var},那么在resolvePath 中会搜寻匹配的系统变量并且替换。7this.configLocations[i] = resolvePath(locations[i]).trim();8}9}10else {11this.configLocations = null;12}13}
refresh 方法分析
1 | public void refresh() throws BeansException, IllegalStateException { |
2 | synchronized (this.startupShutdownMonitor) { |
3 | // Prepare this context for refreshing. |
4 | prepareRefresh(); |
5 | //初始化BeanFactory,并进行xml文件读取 |
6 | // Tell the subclass to refresh the internal bean factory. |
7 | ConfigurableListableBeanFactory beanFactory = obtainFreshBeanFactory(); |
8 | //对beanFactory 进行各种功能填充 |
9 | // Prepare the bean factory for use in this context. |
10 | prepareBeanFactory(beanFactory); |
11 | try { |
12 | // 子类覆盖方法,做额外处理 |
13 | // Allows post-processing of the bean factory in context subclasses. |
14 | postProcessBeanFactory(beanFactory); |
15 | // 激活各种BeanFactory处理器 |
16 | // Invoke factory processors registered as beans in the context. |
17 | invokeBeanFactoryPostProcessors(beanFactory); |
18 | // 注册拦截bean 创建的bean处理器,这里只是注册,真正的调用是在get bean 时。 |
19 | // Register bean processors that intercept bean creation. |
20 | registerBeanPostProcessors(beanFactory); |
21 | // 为上下文处理message 信息源,即不同语言的消息体,国际化处理。 |
22 | // Initialize message source for this context. |
23 | initMessageSource(); |
24 | //初始化应用消息广播器,并放入 applicationEventMulticaster bean 中。 |
25 | // Initialize event multicaster for this context. |
26 | initApplicationEventMulticaster(); |
27 | // 留给子类来初始化其他bean |
28 | // Initialize other special beans in specific context subclasses. |
29 | onRefresh(); |
30 | //在所有的注册bean中查找 LIstener beanm,注册到消息广播器中 |
31 | // Check for listener beans and register them. |
32 | registerListeners(); |
33 | // 初始化剩下的单实例(飞惰性) |
34 | // Instantiate all remaining (non-lazy-init) singletons. |
35 | finishBeanFactoryInitialization(beanFactory); |
36 | //完成刷新过程,通知生命周期处理器 lifecycleProcessor 刷新过程,同时发出ContextRefreshEvent 通知别人 |
37 | // Last step: publish corresponding event. |
38 | finishRefresh(); |
39 | } |
40 | catch (BeansException ex) { |
41 | if (logger.isWarnEnabled()) { |
42 | logger.warn("Exception encountered during context initialization - " + |
43 | "cancelling refresh attempt: " + ex); |
44 | } |
45 | // Destroy already created singletons to avoid dangling resources. |
46 | destroyBeans(); |
47 | // Reset 'active' flag. |
48 | cancelRefresh(ex); |
49 | // Propagate exception to caller. |
50 | throw ex; |
51 | } |
52 | finally { |
53 | // Reset common introspection caches in Spring's core, since we |
54 | // might not ever need metadata for singleton beans anymore... |
55 | resetCommonCaches(); |
56 | } |
57 | } |
58 | } |
功能说明:
初始化前准备工作,例如对系统属性或者环境变量的准备及验证
- 在一些情况下,项目要读取某些系统变量,而这个变量的设置很可能会影响着系统的正确性,那么ClassPathXmlApplicationContext为我们提供的这个准备函数就显得特别重要,他可以在系统启动的时候提前对必须的变量进行存在性验证。
初始化BeanFactory, 并进行xml 的读取
- ClassPathXmlApplicationContext 包含着BeanFactory的所有特性,在这一步骤会服用BeanFactory 的配置文件读取解析以及其他功能,经过该步骤后,ClassPathXmlApplicationContext 实际上就已经BeanFactory所提供的功能,也就是可以进行bean的提取等所有功能了。
对BeanFactory 进行各种填充
- @Qualifier 与 @Autowired 是我们非常熟悉的注解,类似的注解就是在该步骤解析的。
子类覆盖方法做额外处理
- spring 之所以强大,被我们所推崇,除了其在功能上能为我们提供便利外,还有一方面是spring 自身的架构设计,开放式的架构使得我们很容易根据业务需要扩展已经存在的功能。这种开放式的的设计,在spring中随处可见,例如该
postProcessBeanFactory方法。
- spring 之所以强大,被我们所推崇,除了其在功能上能为我们提供便利外,还有一方面是spring 自身的架构设计,开放式的架构使得我们很容易根据业务需要扩展已经存在的功能。这种开放式的的设计,在spring中随处可见,例如该
激活各种BeanFactory处理器
注册拦截bean创建的bean 处理器,这里只是注册,真正的调用是在getBean 的时候
为上下文初始化Message源,及对不同语言的消息进行国际化处理。
初始化应用消息广播器,并放入 “applicationEventMuilticaster” 的bean中。
子类初始化其他bean
在所有的bean中查找listener bean,注册到消息广播中
初始化剩下的单例(非惰性的)
完成刷新过程,通知生命周期处理器 lifecycleProcessor刷新过程。同时发出ContextRefreshEvent通知别人。
环境准备 - prepareRefresh
1 | protected void prepareRefresh() { |
2 | // Switch to active. |
3 | this.startupDate = System.currentTimeMillis(); |
4 | this.closed.set(false); |
5 | this.active.set(true); |
6 | if (logger.isDebugEnabled()) { |
7 | if (logger.isTraceEnabled()) { |
8 | logger.trace("Refreshing " + this); |
9 | } |
10 | else { |
11 | logger.debug("Refreshing " + getDisplayName()); |
12 | } |
13 | } |
14 | //初始化占位符,空方法,子类实现 |
15 | // Initialize any placeholder property sources in the context environment. |
16 | initPropertySources(); |
17 | //验证需要的属性文件是不是已经放入到环境中 |
18 | // Validate that all properties marked as required are resolvable: |
19 | // see ConfigurablePropertyResolver#setRequiredProperties |
20 | getEnvironment().validateRequiredProperties(); |
21 | // Store pre-refresh ApplicationListeners... |
22 | if (this.earlyApplicationListeners == null) { |
23 | this.earlyApplicationListeners = new LinkedHashSet<>(this.applicationListeners); |
24 | } |
25 | else { |
26 | // Reset local application listeners to pre-refresh state. |
27 | this.applicationListeners.clear(); |
28 | this.applicationListeners.addAll(this.earlyApplicationListeners); |
29 | } |
30 | // Allow for the collection of early ApplicationEvents, |
31 | // to be published once the multicaster is available... |
32 | this.earlyApplicationEvents = new LinkedHashSet<>(); |
33 | } |
说明:
- initPropertySources 符合spring 的开放式结构设计,给用户最大扩展spring的能力,用户可以依据自己的需要重写 initPropertyResources 方法,并在方法中进行个性化的属性处理及设置。
- validateRequiredProperties 是对属性的校验,
如何初始化自定义环境变量
1 | public class MyClassPathXmlApplicationContext extends ClassPathXmlApplicationContext{ |
2 | public MyClassPathXmlApplicationContext(String... configLocations){ |
3 | super(configLocations); |
4 | } |
5 | |
6 | protected vodi initPropertySources(){ |
7 | //添加自定义环境变量 |
8 | getEnvironment().setRequiredPerperties("VAR"); |
9 | } |
10 | } |
然后在后期调用 getEnvironment().validateRequiredProperties(); 验证时,若没有检查到 VAR环境变量则抛出异常。
加载beanFactory - obtainFreshBeanFactory
获取beanFactory。经过该方法后,ClassPathXmlApplicationContext 包含了BeanFactory的所有功能。
1 | //AbstractApplicationContext |
2 | protected ConfigurableListableBeanFactory obtainFreshBeanFactory() { |
3 | //初始化beanFactory,并进行xml文件的读取,并将BeanFactory 记录到当前实体的属性中。 |
4 | refreshBeanFactory(); |
5 | //返回当前实体的BeanFactory |
6 | return getBeanFactory(); |
7 | } |
- refreshBeanFactory说明:
1//AbstractRefreshableApplicationContext extends AbstractApplicationContext2protected final void refreshBeanFactory() throws BeansException {3if (hasBeanFactory()) {4destroyBeans();5closeBeanFactory();6}7try {8//创建 beanFactory9DefaultListableBeanFactory beanFactory = createBeanFactory();10//为了序列化指定id,如果需要的话,让这个beanFactory反序列化到BeanFactory对象。11beanFactory.setSerializationId(getId());12//定制beanFactory,设置相关属性,包括是否覆盖同名称不同定义的对象,循环依赖,13//以及设置@Autowired和@Qualifier注解解析器 QualifierAnnotationAutowire14customizeBeanFactory(beanFactory);15//初始化document 以及进行xml文件的读取及解析16loadBeanDefinitions(beanFactory);17synchronized (this.beanFactoryMonitor) {18// 在AbstractRefreshableApplicationContext中添加 beanFactory19this.beanFactory = beanFactory;20}21}22catch (IOException ex) {23throw new ApplicationContextException("I/O error parsing bean definition source for " + getDisplayName(), ex);24}25}
我们在创建BeanFactory时:BeanFactory bf = new XmlBeanFactory("bean.xml");的代码。 其中 XmlBeanFactory继承自 DefaultListableBeanFactory,并提供了 XmlBeanDefinitionReader 类型的reader 属性, DefaultListableBeanFactory 是容器的基础,必须首先实例化。
定制BeanFactory - customizeBeanFactory
这里已经开始对beanFactory 扩展,在基本容器的基础上,增加了是否允许覆盖、是否允许拓展的设置。
1 | //AbstractRefreshableApplicationContext |
2 | protected void customizeBeanFactory(DefaultListableBeanFactory beanFactory) { |
3 | //是否允许覆盖同名称不同定义的对象,allowBeanDefinitionOverriding 不为空,给BeanFactory 设置响应属性, |
4 | if (this.allowBeanDefinitionOverriding != null) { |
5 | beanFactory.setAllowBeanDefinitionOverriding(this.allowBeanDefinitionOverriding); |
6 | } |
7 | //是否允许bean之间存在循环依赖 |
8 | if (this.allowCircularReferences != null) { |
9 | beanFactory.setAllowCircularReferences(this.allowCircularReferences); |
10 | } |
11 | } |
定制 beanFactory的方式
1 | public class MyClasspathXmlApplicationContext extends ClassPathXmlApplicationContext{ |
2 | |
3 | protected void customizeBeanFactory(DefaultListableBeanFactory beanFactory) { |
4 | super.setAllowBeanDefinitionOverriding(false); |
5 | super.setAllowCircularReferences(false); |
6 | super.customizeBeanFactory(beanFactory); |
7 | } |
8 | } |
加载beanDefinition -loadBeanDefinitions
DefaultListableBeanFactory中没有xml读取处理的功能,由XmlBeanDefinitionReader 完成。该步骤中首先要做的是创建 XmlBeanDefinitionReader;
1 | //AbstractXmlApplicationContext extends AbstractRefreshableConfigApplicationContext |
2 | |
3 | protected void loadBeanDefinitions(DefaultListableBeanFactory beanFactory) throws BeansException, IOException { |
4 | // Create a new XmlBeanDefinitionReader for the given BeanFactory. |
5 | XmlBeanDefinitionReader beanDefinitionReader = new XmlBeanDefinitionReader(beanFactory); |
6 | //设置环境变量 |
7 | // Configure the bean definition reader with this context's |
8 | // resource loading environment. |
9 | beanDefinitionReader.setEnvironment(this.getEnvironment()); |
10 | beanDefinitionReader.setResourceLoader(this); |
11 | beanDefinitionReader.setEntityResolver(new ResourceEntityResolver(this)); |
12 | //设置beanDefinitionReader, 可以覆盖 |
13 | // Allow a subclass to provide custom initialization of the reader, |
14 | // then proceed with actually loading the bean definitions. |
15 | initBeanDefinitionReader(beanDefinitionReader); |
16 | //配置文件的读取 |
17 | loadBeanDefinitions(beanDefinitionReader); |
18 | } |
- 配置文件的读取 loadBeanDefinition
1protected void loadBeanDefinitions(XmlBeanDefinitionReader reader) throws BeansException, IOException {2Resource[] configResources = getConfigResources();3if (configResources != null) {4reader.loadBeanDefinitions(configResources);5}6String[] configLocations = getConfigLocations();7if (configLocations != null) {8reader.loadBeanDefinitions(configLocations);9}10}
功能扩展
在进入 prepareBeanFactory 方法前,spring 已经完成了对配置的解析。 ApplicationContext 在功能上的扩展,从 prepareBeanFactory 方法开始。
1 | protected void prepareBeanFactory(ConfigurableListableBeanFactory beanFactory) { |
2 | // 设置BeanFactory 的classLoader 为当前Context 的classLoader |
3 | // Tell the internal bean factory to use the context's class loader etc. |
4 | beanFactory.setBeanClassLoader(getClassLoader()); |
5 | //设置beanFactory的表达式语言处理器 |
6 | // 默认可以使用 #{bean.xxx} 的形式来处理相关属性 |
7 | beanFactory.setBeanExpressionResolver(new StandardBeanExpressionResolver(beanFactory.getBeanClassLoader())); |
8 | //为beanFactory 增加一个默认的propertyEditor,这个主要是对bean的属性等设置管理的一个工具 |
9 | beanFactory.addPropertyEditorRegistrar(new ResourceEditorRegistrar(this, getEnvironment())); |
10 | |
11 | // Configure the bean factory with context callbacks. |
12 | //添加BeanProcessor |
13 | beanFactory.addBeanPostProcessor(new ApplicationContextAwareProcessor(this)); |
14 | // 设置几个忽略自动装配的接口 |
15 | beanFactory.ignoreDependencyInterface(EnvironmentAware.class); |
16 | beanFactory.ignoreDependencyInterface(EmbeddedValueResolverAware.class); |
17 | beanFactory.ignoreDependencyInterface(ResourceLoaderAware.class); |
18 | beanFactory.ignoreDependencyInterface(ApplicationEventPublisherAware.class); |
19 | beanFactory.ignoreDependencyInterface(MessageSourceAware.class); |
20 | beanFactory.ignoreDependencyInterface(ApplicationContextAware.class); |
21 | |
22 | // BeanFactory interface not registered as resolvable type in a plain factory. |
23 | // MessageSource registered (and found for autowiring) as a bean. |
24 | // 设置几个自动装配的特殊规则 |
25 | beanFactory.registerResolvableDependency(BeanFactory.class, beanFactory); |
26 | beanFactory.registerResolvableDependency(ResourceLoader.class, this); |
27 | beanFactory.registerResolvableDependency(ApplicationEventPublisher.class, this); |
28 | beanFactory.registerResolvableDependency(ApplicationContext.class, this); |
29 | |
30 | // Register early post-processor for detecting inner beans as ApplicationListeners. |
31 | // 设置 ApplicationListeners |
32 | beanFactory.addBeanPostProcessor(new ApplicationListenerDetector(this)); |
33 | |
34 | // 增加对 AspectJ的支持 |
35 | // Detect a LoadTimeWeaver and prepare for weaving, if found. |
36 | if (beanFactory.containsBean(LOAD_TIME_WEAVER_BEAN_NAME)) { |
37 | beanFactory.addBeanPostProcessor(new LoadTimeWeaverAwareProcessor(beanFactory)); |
38 | // Set a temporary ClassLoader for type matching. |
39 | beanFactory.setTempClassLoader(new ContextTypeMatchClassLoader(beanFactory.getBeanClassLoader())); |
40 | } |
41 | // 怎加默认的系统环境bean |
42 | // Register default environment beans. |
43 | if (!beanFactory.containsLocalBean(ENVIRONMENT_BEAN_NAME)) { |
44 | beanFactory.registerSingleton(ENVIRONMENT_BEAN_NAME, getEnvironment()); |
45 | } |
46 | if (!beanFactory.containsLocalBean(SYSTEM_PROPERTIES_BEAN_NAME)) { |
47 | beanFactory.registerSingleton(SYSTEM_PROPERTIES_BEAN_NAME, getEnvironment().getSystemProperties()); |
48 | } |
49 | if (!beanFactory.containsLocalBean(SYSTEM_ENVIRONMENT_BEAN_NAME)) { |
50 | beanFactory.registerSingleton(SYSTEM_ENVIRONMENT_BEAN_NAME, getEnvironment().getSystemEnvironment()); |
51 | } |
52 | } |
以上拓展功能有:
- 增加对SPEL 语言的支持
- 增加对属性编辑器的支持
- 增加一些内置类; *Aware
- 设置了一些依赖功能可忽略的接口
- 设置一些固定依赖的属性
- 添加 ApplicationListeners
- 增加 aspectJ 的支持
- 将环境变量及属性以单例模式注册
增加SpEL语言支持 Spring Expression Language
- 作用:在运行时,构建复杂表达式,存取对象属性,对象方法调用等。并且与Spring功能完美整合。如:配置 Bean的定义。
- SpEL 是单独模块,只依赖于core 模块,不依赖与其他模块,可以单独使用。
- SpEL 使用 “#{…}” 为定界符,所有的在 {} 以内的字符都被认为是 SpEL语言。如:相当于:
1<bean id = "saxophone" class ="xxx.xxx.Xxx"></bean>2<bean id = "aaa" class ="xxx.xxx.AAA">3<property name="instrument" value="#{saxophone}">4</bean>1<bean id = "saxophone" class ="xxx.xxx.Xxx"></bean>2<bean id = "aaa" class ="xxx.xxx.AAA">3<property name="instrument" ref="saxophone">4</bean> - SpEL解析器注册后,实际的解析时间:
之前我们讲解过Spring 在bean 进行初始化的时候会有属性填充的一步,而在这一步中Spring 会调用AbstractAutowireCapableBeanFactory 类的applyPropertyValues 函数来完成功能。就在这个函数中,会通过构造BeanDefinitionValueResolver 类型实例valueResolver 来进行属性值的解
析。同时,也是在这个步骤中一般通过AbstractBeanFactory 中的evaluateBeanDefinitionString方法去完成SpEL 的解析。当调用这个方法时会判断是否存在语言解析器,如果存在则调用语言解析器的方法进行解析, 解析的过程是在Spring 的Expression 的包内,这里不做过多解释。我们通过查看对evaluateBeanDefinitionString方法的调用层次可以看出, 应用语言解析器的调用主要是在解析依赖注入bean 的时候,以及在完成bean 的初始化和属性获取后进行属性填充的时候。1protected Object evaluateBeanDefinitionString ( String value , BeanDefinition beanDefinition) (2if (this beanExpressionResolver == null) {3return value ;4}5Scope scope = (beanDefinition 1= null ? getRegisteredScope(beanCefinition.getScope()) : null) ;6return this.BeanExpressionResolver.evaluate(value , new BeanExpressionContext (this ,scope));7}
增加属性注册编辑器 - beanFactory.addPropertyEditorRegistrar(new ResourceEditorRegistrar(this, getEnvironment()));
使用自定义属性编辑器
使用自定义属性编辑器,通过继承PropertyEditorSupport,重写setAsText 方法,具体步骤如下:编写自定义属性编辑器
1//自定义属性编辑器2public class DatePropertyEditor extends PropertyEditorSupport{3private String formart = "yyyy-MM-dd";4public void setFormart(String formart){5this.formart = formart;6}78public void setAsText(String arg0) throws IllegalArguementException{9System.out.println("arg0:" + arg0);10SimpleDateFormart sdf = new SimpleDateFormart(formart);11Date d = sdf.prase(arg0);12this.setValue(d);13}14}将自定义属性编辑器注册到容器中
1<!---向定义属性编辑器-->2<bean class = "org.Springframework.beans.factory.config.CustomEditorConfigurer">3<property name="customEditors">4<map>5<entry key="java.util.Date">6<bean class="com.test.DatePropertyEditor">7<property name="format" value="yyyy-MM-dd"/>8</bean>9</entry>10</map>11</property>12</bean>
注册Spring 自带的属性编辑器 CustomDateEditor
通过注册Spring 自带的属性编辑器CustomDateEditor,具体步骤如下:定义属性编辑器
1public class DatePropertyEditorRegistrar implements PropertyEditorRegistrar{2public void registerCustomEditors(PropertyEditorRegistry registry){3registry.registerCustomEditor(Data.class,new CustomDataEditor(new SimpleDateFormart("yyyy-MM-dd"),true));4}5}注册到Spring中:
1<!--注册Spring 自带编辑器-->2<bean class= "org.Springframework.beans.factory.config.CustomEditorConfigurer">3<property name= "propertyEditorRegistrars" >4<list>5<bean class= "com.test.DatePropeortyEditorRegistrar"></bean>6</list>7</property>8</bean>通过在配置文件中将自定义的 DatePropertyEditorRegistrar 注册进入
org.Springframework.beans.factory.config.CustomEditorConfigurer的 propertyEditorRegistrars中,具体的效果和方法1相同。
- ResourceEditorRegistrar 使用说明
1 | public void registerCustomEditors(PropertyEditorRegistry registry) { |
2 | ResourceEditor baseEditor = new ResourceEditor(this.resourceLoader, this.propertyResolver); |
3 | doRegisterEditor(registry, Resource.class, baseEditor); |
4 | doRegisterEditor(registry, ContextResource.class, baseEditor); |
5 | doRegisterEditor(registry, InputStream.class, new InputStreamEditor(baseEditor)); |
6 | doRegisterEditor(registry, InputSource.class, new InputSourceEditor(baseEditor)); |
7 | doRegisterEditor(registry, File.class, new FileEditor(baseEditor)); |
8 | doRegisterEditor(registry, Path.class, new PathEditor(baseEditor)); |
9 | doRegisterEditor(registry, Reader.class, new ReaderEditor(baseEditor)); |
10 | doRegisterEditor(registry, URL.class, new URLEditor(baseEditor)); |
11 | |
12 | ClassLoader classLoader = this.resourceLoader.getClassLoader(); |
13 | doRegisterEditor(registry, URI.class, new URIEditor(classLoader)); |
14 | doRegisterEditor(registry, Class.class, new ClassEditor(classLoader)); |
15 | doRegisterEditor(registry, Class[].class, new ClassArrayEditor(classLoader)); |
16 | |
17 | if (this.resourceLoader instanceof ResourcePatternResolver) { |
18 | doRegisterEditor(registry, Resource[].class, |
19 | new ResourceArrayPropertyEditor((ResourcePatternResolver) this.resourceLoader, this.propertyResolver)); |
20 | } |
21 | } |
22 | private void doRegisterEditor(PropertyEditorRegistry registry, Class<?> requiredType, PropertyEditor editor) { |
23 | if (registry instanceof PropertyEditorRegistrySupport) { |
24 | ((PropertyEditorRegistrySupport) registry).overrideDefaultEditor(requiredType, editor); |
25 | } |
26 | else { |
27 | registry.registerCustomEditor(requiredType, editor); |
28 | } |
29 | } |
- 通过以上代码分析,ResourceEditorRegistrar.registerCustomEditors 方法的最后还是注册了一系列常用的属性编辑器,例如,代码doRegisterEditor(registry, Class.class, new ClassEditor(classLoader)) 实现的功能就是注册class 类对应的属性编辑器。注册后,一旦在某个实体bean中中存在一些Class类的属性,那么Spring 会调用 ClassEditor 将配置的String 类型转换为对应的class 类型,并且进行赋值。
- 疑问?:
ResourceEditorRegistrar.registerCustomEditors 方法核心功能是批量注册了常用类型的属性编辑器,但是 beanFactory.addPropertyEditorRegistrar(new ResourceEditorRegistrar(this, getEnvironment())); 方法仅仅是注册了 ResourceEditorRegistrar实例,却没有调用 ResourceEditorRegistrar.registerCustomEditors 进行注册,所以属性又是怎么注册进去的呢?
经过产看 ResourceEditorRegistrar.registerCustomEditors 方法的调用关系,发现 AbstractBeanFactory.registerCustomEditors 方法调用了 ResourceEditorRegistrar.registerCustomEditors方法。
查看 AbstractBeanFactory.registerCustomEditors 的调用关系:
上图我们看到 AbstractBeanFactory.initBeanWrapper方法调用了 AbstractBeanFactory.registerCustomEditors 方法。这是在bean 初始化时使用的一个方法,主要是在将BeanDefinition 转换为BeanWrapp巳r 后用于对属性的填充
我们可以得出结论:在bean的初始化后会调用 ResourceEditorRegistrar.registerCustomEditors 方法进行批量的通用属性编辑器注册。注册后,在属性填充的环节便可以直接Spring 使用这些编辑器进行属性的解析了。
- 提到了BeanWrapper,有必要强调下,Spring 中用于封装bean 的是BeanWrapper类型,而它又间接继承了PropertyEditorRegistry 类型,也就是我们之前反复看到的方法参数
PropertyEditorRegistry registory,其实大部分情况下都是BeanWrapper ,对于BeanWrapper 在Spring 中的默认实现是BeanWrapperlmpl,而BeanWrapperlmpl 除了实现Bean Wrapper 接口外还继承了PropertyEditorRegistrySupport类,其中PropertyEditorRegistrySupport.createDefaultEditors,我们可以看到Spring中定义了上面一系列常用的属性编辑器使我们可以方便地进行配置。如果我们定义的bean 中的某个属性的类型不在上面的常用配置中的话,才需要我们进行个性化属性编辑器的注册。1private void createDefaultEditors() {2this.defaultEditors = new HashMap<>(64);34// Simple editors, without parameterization capabilities.5// The JDK does not contain a default editor for any of these target types.6this.defaultEditors.put(Charset.class, new CharsetEditor());7this.defaultEditors.put(Class.class, new ClassEditor());8this.defaultEditors.put(Class[].class, new ClassArrayEditor());9this.defaultEditors.put(Currency.class, new CurrencyEditor());10this.defaultEditors.put(File.class, new FileEditor());11this.defaultEditors.put(InputStream.class, new InputStreamEditor());12this.defaultEditors.put(InputSource.class, new InputSourceEditor());13this.defaultEditors.put(Locale.class, new LocaleEditor());14this.defaultEditors.put(Path.class, new PathEditor());15this.defaultEditors.put(Pattern.class, new PatternEditor());16this.defaultEditors.put(Properties.class, new PropertiesEditor());17this.defaultEditors.put(Reader.class, new ReaderEditor());18this.defaultEditors.put(Resource[].class, new ResourceArrayPropertyEditor());19this.defaultEditors.put(TimeZone.class, new TimeZoneEditor());20this.defaultEditors.put(URI.class, new URIEditor());21this.defaultEditors.put(URL.class, new URLEditor());22this.defaultEditors.put(UUID.class, new UUIDEditor());23this.defaultEditors.put(ZoneId.class, new ZoneIdEditor());2425// Default instances of collection editors.26// Can be overridden by registering custom instances of those as custom editors.27this.defaultEditors.put(Collection.class, new CustomCollectionEditor(Collection.class));28this.defaultEditors.put(Set.class, new CustomCollectionEditor(Set.class));29this.defaultEditors.put(SortedSet.class, new CustomCollectionEditor(SortedSet.class));30this.defaultEditors.put(List.class, new CustomCollectionEditor(List.class));31this.defaultEditors.put(SortedMap.class, new CustomMapEditor(SortedMap.class));3233// Default editors for primitive arrays.34this.defaultEditors.put(byte[].class, new ByteArrayPropertyEditor());35this.defaultEditors.put(char[].class, new CharArrayPropertyEditor());3637// The JDK does not contain a default editor for char!38this.defaultEditors.put(char.class, new CharacterEditor(false));39this.defaultEditors.put(Character.class, new CharacterEditor(true));4041// Spring's CustomBooleanEditor accepts more flag values than the JDK's default editor.42this.defaultEditors.put(boolean.class, new CustomBooleanEditor(false));43this.defaultEditors.put(Boolean.class, new CustomBooleanEditor(true));4445// The JDK does not contain default editors for number wrapper types!46// Override JDK primitive number editors with our own CustomNumberEditor.47this.defaultEditors.put(byte.class, new CustomNumberEditor(Byte.class, false));48this.defaultEditors.put(Byte.class, new CustomNumberEditor(Byte.class, true));49this.defaultEditors.put(short.class, new CustomNumberEditor(Short.class, false));50this.defaultEditors.put(Short.class, new CustomNumberEditor(Short.class, true));51this.defaultEditors.put(int.class, new CustomNumberEditor(Integer.class, false));52this.defaultEditors.put(Integer.class, new CustomNumberEditor(Integer.class, true));53this.defaultEditors.put(long.class, new CustomNumberEditor(Long.class, false));54this.defaultEditors.put(Long.class, new CustomNumberEditor(Long.class, true));55this.defaultEditors.put(float.class, new CustomNumberEditor(Float.class, false));56this.defaultEditors.put(Float.class, new CustomNumberEditor(Float.class, true));57this.defaultEditors.put(double.class, new CustomNumberEditor(Double.class, false));58this.defaultEditors.put(Double.class, new CustomNumberEditor(Double.class, true));59this.defaultEditors.put(BigDecimal.class, new CustomNumberEditor(BigDecimal.class, true));60this.defaultEditors.put(BigInteger.class, new CustomNumberEditor(BigInteger.class, true));6162// Only register config value editors if explicitly requested.63if (this.configValueEditorsActive) {64StringArrayPropertyEditor sae = new StringArrayPropertyEditor();65this.defaultEditors.put(String[].class, sae);66this.defaultEditors.put(short[].class, sae);67this.defaultEditors.put(int[].class, sae);68this.defaultEditors.put(long[].class, sae);69}70}
添加ApplicationContextAwareProcessor 处理器 -beanFactory.addBeanPostProcessor(new ApplicationContextAwareProcessor(this));
beanFactory.addBeanPostProcessor(new ApplicationContextAwareProcessor(this)) 的主要目的是注册一个 BeanPostProcessor。真正的逻辑还是在 ApplicationContextAwareProcessor中。
ApplicationContextAwareProcessor implements BeanPostProcessor 在bean 实例化的时候,也就是在激活 bean 的init-method 的前后,会调用 BeanPostProcessor.postProcessorBeforeInitialization 和 BeanPostProcessor.postProcessorAfterInitialization方法。同样对 ApplicationContextAwareProcessor 我们也关心这两个方法。
对于 postProcessorAfterInitialization 方法,在 ApplicationContextAwareProcessor 中并没有实现。所以这里只关注 ApplicationContextAwareProcessor.postProcessorBeforeInitialization 方法;
1 | public Object postProcessBeforeInitialization(Object bean, String beanName) throws BeansException { |
2 | if (!(bean instanceof EnvironmentAware || bean instanceof EmbeddedValueResolverAware || |
3 | bean instanceof ResourceLoaderAware || bean instanceof ApplicationEventPublisherAware || |
4 | bean instanceof MessageSourceAware || bean instanceof ApplicationContextAware)){ |
5 | return bean; |
6 | } |
7 | |
8 | AccessControlContext acc = null; |
9 | |
10 | if (System.getSecurityManager() != null) { |
11 | acc = this.applicationContext.getBeanFactory().getAccessControlContext(); |
12 | } |
13 | |
14 | if (acc != null) { |
15 | AccessController.doPrivileged((PrivilegedAction<Object>) () -> { |
16 | invokeAwareInterfaces(bean); |
17 | return null; |
18 | }, acc); |
19 | } |
20 | else { |
21 | invokeAwareInterfaces(bean); |
22 | } |
23 | |
24 | return bean; |
25 | } |
26 | |
27 | private void invokeAwareInterfaces(Object bean) { |
28 | if (bean instanceof EnvironmentAware) { |
29 | ((EnvironmentAware) bean).setEnvironment(this.applicationContext.getEnvironment()); |
30 | } |
31 | if (bean instanceof EmbeddedValueResolverAware) { |
32 | ((EmbeddedValueResolverAware) bean).setEmbeddedValueResolver(this.embeddedValueResolver); |
33 | } |
34 | if (bean instanceof ResourceLoaderAware) { |
35 | ((ResourceLoaderAware) bean).setResourceLoader(this.applicationContext); |
36 | } |
37 | if (bean instanceof ApplicationEventPublisherAware) { |
38 | ((ApplicationEventPublisherAware) bean).setApplicationEventPublisher(this.applicationContext); |
39 | } |
40 | if (bean instanceof MessageSourceAware) { |
41 | ((MessageSourceAware) bean).setMessageSource(this.applicationContext); |
42 | } |
43 | if (bean instanceof ApplicationContextAware) { |
44 | ((ApplicationContextAware) bean).setApplicationContext(this.applicationContext); |
45 | } |
46 | } |
主要是一些 *Aware 接口的bean 实现。这些bean 可以获取Spring容器中的一些特殊资源。供业务使用。
设置忽略依赖
当Spring 将 ApplicationContextAwareProcessor 注册后,那么在invokeAwareInterface方法中间接调用的 Aware 类已经不是普通的bean了。如 ResourceLoaderAware,ApplicationEventPublisherAware等,那么当然需要在Spring 做 bean 的依赖注入的时候忽略它们。而 beanFactory.ignoreDependencyInterface 就是此作用。
注册依赖
Spring 中有了忽略依赖的功能,当让必不可少也会有注册依赖的功能。
1 | beanFactory.registerResolvableDependency(BeanFactory.class, beanFactory); |
2 | beanFactory.registerResolvableDependency(ResourceLoader.class, this); |
3 | beanFactory.registerResolvableDependency(ApplicationEventPublisher.class, this); |
4 | beanFactory.registerResolvableDependency(ApplicationContext.class, this); |
当注册了解析依赖后,例如当注册了对BeanFactory.class 的解析依赖后,当bean 的属性注入的时候,一旦检测到属性为 BeanFactory 类型便会将 beanFactory 的实例注入进去。
BeanFactory 的后处理
beanFactory 作为Spring 中容器功能的基础,用于存放所有已经加载的bean,为了保证程序上的高拓展性。Spring 针对BeanFactory 做了大量的扩展,比如我们熟知的 PostProcessor 等都在这里实现的。 注册方法是 beanFactory.addBeanPostProcessor
子类覆盖 - postProcessBeanFactory (空方法,留给子类实现对BeanFacotry做额外的处理使用).
激活注册的BeanFactoryPostProcessor -invokeBeanFactoryPostProcessors
对 BeanFactoryPostProcessor 的调用 调用
BeanFactoryPostProcessor的用法:
BeanFactoryPostProcessor接口跟BeanPostProcessor类似,可以对Bean 的定义(配置元数据)进行处理。也就是说,Spring IOC 容器允许BeanFactoryPostProcessor 在容器实际实例化任何其他bean 之前读取配置元数据,并且有可能修改它。如果业务需要,我们也可以配置多个BeanFactoryPostProcessor。你还可能通过设置order属性来控制 BeanFactoryPostProcessor 的执行次序(仅当 BeanFactoryPostProcessor 实现了Order 接口才可以设置此属性,因此在实现 BeanFactoryPostProcessor 时,就应到考虑先实现Order 接口。)如果我们想改变实际的Bean 实例(如从配置元数据中创建的对象),那么我们最好还是使用
BeanPostProcessor. 同样的,BeanFactoryPostProcessor 的作用范围是容器级别的。它只和我们使用的容器有关。如果我们在容器中定一个BeanFactoryPostProcessor,那么它仅仅是对容器中的bean 进行后置处理。BeanFactoryPostProcessor不会对定义在另一个容器中的bean 做后置处理,即使这两个容器都是在统一层次上。spring 中存在对
BeanFactoryPostProcessor的典型应用,如:PropertyPlaceholderConfigurerBeanFactoryPostProcessor 的典型应用: PropertyPlaceholderConfigurer
有时候,阅读Spring 的bean 描述文件时,我们会遇到如下的一些配置:1<bean id="message" class = "distConfig.HelloMessage">2<property name="mes">3<value>${bean.message}</value>4</property>5</bean>其中出现了变量的引用:${bean.message}. 这就是spring 的分散配置,可以在另外的配置文件中为 bean.message 指定值。如在bean.property 配置文件如下定义:
1bean.message = Hi,can you find me?当访问名为 message 的bean时,mes 属性就会被配置为字符串 “ Hi,can you find me?”,但Spring 框架是怎么知道存在这样的配置文件呢?这就要靠
PropertyPlaceholderConfigurer这个类的bean:1<bean id="mesHandler" class ="org.Springframework.beans.factory.config.PropertyPlaceholderConfigurer">2<property name ="locations">3<list>4<value>config/bean.properties<value>5</list>6</property>7</bean>在这个 bean 中指定了配置文件为 config/bean.properties. 这里似乎找到了问题的答案了。但是其中还有一个问题,这个
mesHandler中只不过是 Spring 框架管理的一个bean,并没有被别的bean或者对象引用,Spring的BeanFactory 是怎么知道要从这个bean 中获取配置文件信息呢?
查看层级结构可以看出 PropertyPlaceholderConfigurer 这个类简介继承了 BeanFactoryPostProcessor 接口。这是一个很特别的接口,当Spring 加载任何实现了这个接口的bean的配置时,都会在bean 工厂载入所有bean 的配置之后执行 postProcessBeanFactory方法。在 PropertyPlaceholderConfigurer类中实现了 postProcessBeanFactory 方法,在方法中先后调用 mergeProperties,convertProperties,processProperties 这三个方法,分别得到配置,将得到的配置转换为合适的类型,最后将配置内容告知 BeanFactory.
正是通过实现 BeanFactoryPostProcessor, BeanFactory会在实例化任何bean之前获得配置信息,从而能够正确解析bean 描述文件中的变量引用。
- 使用自定义 BeanFactoryPostProcessor (使用方式)
我们以实现 一个 BeanFactoryPostProcessor, 去除潜在 “流氓” 属性值的功能来展示自定义 BeanFactoryPostProcessor 的创建及使用,例如bean 定义中留下bollocks 这样的字眼。
使用示例: 项目SpringDemon 路径: com.zbcn.springDemon.processor.demon.PropertyConfigurerDemo
- 激活BeanFactoryPostProcessor (源码分析) 实例化和调用所有的 已注册的 BeanFactoryPostProcessor
具体实现在 PostProcessorRegistrationDelegate 中
1 | public static void invokeBeanFactoryPostProcessors( |
2 | ConfigurableListableBeanFactory beanFactory, List<BeanFactoryPostProcessor> beanFactoryPostProcessors) { |
3 | |
4 | // Invoke BeanDefinitionRegistryPostProcessors first, if any. |
5 | Set<String> processedBeans = new HashSet<>(); |
6 | //BeanDefinitionRegistry类型的处理 |
7 | if (beanFactory instanceof BeanDefinitionRegistry) { |
8 | BeanDefinitionRegistry registry = (BeanDefinitionRegistry) beanFactory; |
9 | List<BeanFactoryPostProcessor> regularPostProcessors = new ArrayList<>(); |
10 | List<BeanDefinitionRegistryPostProcessor> registryProcessors = new ArrayList<>(); |
11 | //区分普通的 processor 和 BeanDefinitionRegistryPostProcessor |
12 | for (BeanFactoryPostProcessor postProcessor : beanFactoryPostProcessors) { |
13 | if (postProcessor instanceof BeanDefinitionRegistryPostProcessor) { |
14 | BeanDefinitionRegistryPostProcessor registryProcessor = |
15 | (BeanDefinitionRegistryPostProcessor) postProcessor; |
16 | registryProcessor.postProcessBeanDefinitionRegistry(registry); |
17 | registryProcessors.add(registryProcessor); |
18 | } |
19 | else { |
20 | regularPostProcessors.add(postProcessor); |
21 | } |
22 | } |
23 | |
24 | // Do not initialize FactoryBeans here: We need to leave all regular beans |
25 | // uninitialized to let the bean factory post-processors apply to them! |
26 | // Separate between BeanDefinitionRegistryPostProcessors that implement |
27 | // PriorityOrdered, Ordered, and the rest. |
28 | List<BeanDefinitionRegistryPostProcessor> currentRegistryProcessors = new ArrayList<>(); |
29 | |
30 | // First, invoke the BeanDefinitionRegistryPostProcessors that implement PriorityOrdered. |
31 | String[] postProcessorNames = |
32 | beanFactory.getBeanNamesForType(BeanDefinitionRegistryPostProcessor.class, true, false); |
33 | for (String ppName : postProcessorNames) { |
34 | if (beanFactory.isTypeMatch(ppName, PriorityOrdered.class)) { |
35 | currentRegistryProcessors.add(beanFactory.getBean(ppName, BeanDefinitionRegistryPostProcessor.class)); |
36 | processedBeans.add(ppName); |
37 | } |
38 | } |
39 | sortPostProcessors(currentRegistryProcessors, beanFactory); |
40 | registryProcessors.addAll(currentRegistryProcessors); |
41 | invokeBeanDefinitionRegistryPostProcessors(currentRegistryProcessors, registry); |
42 | currentRegistryProcessors.clear(); |
43 | |
44 | // Next, invoke the BeanDefinitionRegistryPostProcessors that implement Ordered. |
45 | postProcessorNames = beanFactory.getBeanNamesForType(BeanDefinitionRegistryPostProcessor.class, true, false); |
46 | for (String ppName : postProcessorNames) { |
47 | if (!processedBeans.contains(ppName) && beanFactory.isTypeMatch(ppName, Ordered.class)) { |
48 | currentRegistryProcessors.add(beanFactory.getBean(ppName, BeanDefinitionRegistryPostProcessor.class)); |
49 | processedBeans.add(ppName); |
50 | } |
51 | } |
52 | sortPostProcessors(currentRegistryProcessors, beanFactory); |
53 | registryProcessors.addAll(currentRegistryProcessors); |
54 | invokeBeanDefinitionRegistryPostProcessors(currentRegistryProcessors, registry); |
55 | currentRegistryProcessors.clear(); |
56 | |
57 | // Finally, invoke all other BeanDefinitionRegistryPostProcessors until no further ones appear. |
58 | boolean reiterate = true; |
59 | while (reiterate) { |
60 | reiterate = false; |
61 | postProcessorNames = beanFactory.getBeanNamesForType(BeanDefinitionRegistryPostProcessor.class, true, false); |
62 | for (String ppName : postProcessorNames) { |
63 | if (!processedBeans.contains(ppName)) { |
64 | currentRegistryProcessors.add(beanFactory.getBean(ppName, BeanDefinitionRegistryPostProcessor.class)); |
65 | processedBeans.add(ppName); |
66 | reiterate = true; |
67 | } |
68 | } |
69 | sortPostProcessors(currentRegistryProcessors, beanFactory); |
70 | registryProcessors.addAll(currentRegistryProcessors); |
71 | invokeBeanDefinitionRegistryPostProcessors(currentRegistryProcessors, registry); |
72 | currentRegistryProcessors.clear(); |
73 | } |
74 | |
75 | // Now, invoke the postProcessBeanFactory callback of all processors handled so far. |
76 | invokeBeanFactoryPostProcessors(registryProcessors, beanFactory); |
77 | invokeBeanFactoryPostProcessors(regularPostProcessors, beanFactory); |
78 | } |
79 | |
80 | else { |
81 | // Invoke factory processors registered with the context instance. |
82 | invokeBeanFactoryPostProcessors(beanFactoryPostProcessors, beanFactory); |
83 | } |
84 | |
85 | // Do not initialize FactoryBeans here: We need to leave all regular beans |
86 | // uninitialized to let the bean factory post-processors apply to them! |
87 | String[] postProcessorNames = |
88 | beanFactory.getBeanNamesForType(BeanFactoryPostProcessor.class, true, false); |
89 | |
90 | // Separate between BeanFactoryPostProcessors that implement PriorityOrdered, |
91 | // Ordered, and the rest. |
92 | List<BeanFactoryPostProcessor> priorityOrderedPostProcessors = new ArrayList<>(); |
93 | List<String> orderedPostProcessorNames = new ArrayList<>(); |
94 | List<String> nonOrderedPostProcessorNames = new ArrayList<>(); |
95 | for (String ppName : postProcessorNames) { |
96 | if (processedBeans.contains(ppName)) { |
97 | // skip - already processed in first phase above |
98 | } |
99 | else if (beanFactory.isTypeMatch(ppName, PriorityOrdered.class)) { |
100 | priorityOrderedPostProcessors.add(beanFactory.getBean(ppName, BeanFactoryPostProcessor.class)); |
101 | } |
102 | else if (beanFactory.isTypeMatch(ppName, Ordered.class)) { |
103 | orderedPostProcessorNames.add(ppName); |
104 | } |
105 | else { |
106 | nonOrderedPostProcessorNames.add(ppName); |
107 | } |
108 | } |
109 | //按照优先级 |
110 | // First, invoke the BeanFactoryPostProcessors that implement PriorityOrdered. |
111 | sortPostProcessors(priorityOrderedPostProcessors, beanFactory); |
112 | invokeBeanFactoryPostProcessors(priorityOrderedPostProcessors, beanFactory); |
113 | //按照order |
114 | // Next, invoke the BeanFactoryPostProcessors that implement Ordered. |
115 | List<BeanFactoryPostProcessor> orderedPostProcessors = new ArrayList<>(orderedPostProcessorNames.size()); |
116 | for (String postProcessorName : orderedPostProcessorNames) { |
117 | orderedPostProcessors.add(beanFactory.getBean(postProcessorName, BeanFactoryPostProcessor.class)); |
118 | } |
119 | sortPostProcessors(orderedPostProcessors, beanFactory); |
120 | invokeBeanFactoryPostProcessors(orderedPostProcessors, beanFactory); |
121 | //其他的 |
122 | // Finally, invoke all other BeanFactoryPostProcessors. |
123 | List<BeanFactoryPostProcessor> nonOrderedPostProcessors = new ArrayList<>(nonOrderedPostProcessorNames.size()); |
124 | for (String postProcessorName : nonOrderedPostProcessorNames) { |
125 | nonOrderedPostProcessors.add(beanFactory.getBean(postProcessorName, BeanFactoryPostProcessor.class)); |
126 | } |
127 | invokeBeanFactoryPostProcessors(nonOrderedPostProcessors, beanFactory); |
128 | |
129 | // Clear cached merged bean definitions since the post-processors might have |
130 | // modified the original metadata, e.g. replacing placeholders in values... |
131 | beanFactory.clearMetadataCache(); |
132 | } |
说明:
- registryProcessors 记录通过硬编码或者配置方式注册的
BeanDefinitionRegistryPostProcessors - regularPostProcessors 记录的是
BeanFactoryPostProcessor类型的处理器
注册 BeanPostProcessor - registerBeanPostProcessors
对BeanPostProcessor的注册 注册
Spring 中的大部分功能都是通过狗处理器的方式进行扩展的,这是Spring框架的一个特性. 但是在BeanFactory 中其实并没有实现后处理器的自动注册,所以在调用的时候如果没有手动注册,则功能不可用.所以在 ApplicationContext 中添加了自动注册的功能.
1 | //AbstractApplicationContext |
2 | protected void registerBeanPostProcessors(ConfigurableListableBeanFactory beanFactory) { |
3 | PostProcessorRegistrationDelegate.registerBeanPostProcessors(beanFactory, this); |
4 | } |
5 | //PostProcessorRegistrationDelegate |
6 | public static void registerBeanPostProcessors( |
7 | ConfigurableListableBeanFactory beanFactory, AbstractApplicationContext applicationContext) { |
8 | |
9 | String[] postProcessorNames = beanFactory.getBeanNamesForType(BeanPostProcessor.class, true, false); |
10 | |
11 | // Register BeanPostProcessorChecker that logs an info message when |
12 | // a bean is created during BeanPostProcessor instantiation, i.e. when |
13 | // a bean is not eligible for getting processed by all BeanPostProcessors. |
14 | /** |
15 | *BeanPostProcessorChecker是一个普通的信息打印,可能情况: |
16 | * 当Spring 的配置中的后处理其还没有被注册就已经开始bean的初始化.则会在BeanPostProcessorChecker中设定信息 |
17 | */ |
18 | int beanProcessorTargetCount = beanFactory.getBeanPostProcessorCount() + 1 + postProcessorNames.length; |
19 | beanFactory.addBeanPostProcessor(new BeanPostProcessorChecker(beanFactory, beanProcessorTargetCount)); |
20 | |
21 | // Separate between BeanPostProcessors that implement PriorityOrdered, |
22 | // Ordered, and the rest. |
23 | List<BeanPostProcessor> priorityOrderedPostProcessors = new ArrayList<>(); |
24 | List<BeanPostProcessor> internalPostProcessors = new ArrayList<>(); |
25 | List<String> orderedPostProcessorNames = new ArrayList<>(); |
26 | List<String> nonOrderedPostProcessorNames = new ArrayList<>(); |
27 | for (String ppName : postProcessorNames) { |
28 | if (beanFactory.isTypeMatch(ppName, PriorityOrdered.class)) { |
29 | BeanPostProcessor pp = beanFactory.getBean(ppName, BeanPostProcessor.class); |
30 | priorityOrderedPostProcessors.add(pp); |
31 | if (pp instanceof MergedBeanDefinitionPostProcessor) { |
32 | internalPostProcessors.add(pp); |
33 | } |
34 | } |
35 | else if (beanFactory.isTypeMatch(ppName, Ordered.class)) { |
36 | orderedPostProcessorNames.add(ppName); |
37 | } |
38 | else { |
39 | nonOrderedPostProcessorNames.add(ppName); |
40 | } |
41 | } |
42 | |
43 | // First, register the BeanPostProcessors that implement PriorityOrdered. |
44 | sortPostProcessors(priorityOrderedPostProcessors, beanFactory); |
45 | registerBeanPostProcessors(beanFactory, priorityOrderedPostProcessors); |
46 | |
47 | // Next, register the BeanPostProcessors that implement Ordered. |
48 | List<BeanPostProcessor> orderedPostProcessors = new ArrayList<>(orderedPostProcessorNames.size()); |
49 | for (String ppName : orderedPostProcessorNames) { |
50 | BeanPostProcessor pp = beanFactory.getBean(ppName, BeanPostProcessor.class); |
51 | orderedPostProcessors.add(pp); |
52 | if (pp instanceof MergedBeanDefinitionPostProcessor) { |
53 | internalPostProcessors.add(pp); |
54 | } |
55 | } |
56 | sortPostProcessors(orderedPostProcessors, beanFactory); |
57 | registerBeanPostProcessors(beanFactory, orderedPostProcessors); |
58 | |
59 | // Now, register all regular BeanPostProcessors. |
60 | List<BeanPostProcessor> nonOrderedPostProcessors = new ArrayList<>(nonOrderedPostProcessorNames.size()); |
61 | for (String ppName : nonOrderedPostProcessorNames) { |
62 | BeanPostProcessor pp = beanFactory.getBean(ppName, BeanPostProcessor.class); |
63 | nonOrderedPostProcessors.add(pp); |
64 | if (pp instanceof MergedBeanDefinitionPostProcessor) { |
65 | internalPostProcessors.add(pp); |
66 | } |
67 | } |
68 | registerBeanPostProcessors(beanFactory, nonOrderedPostProcessors); |
69 | //注册所有 MergedBeanDefinitionPostProcessor,该方法不会重复注册,在执行过程中会移除已经存在的beanPostProcessor |
70 | // Finally, re-register all internal BeanPostProcessors. |
71 | sortPostProcessors(internalPostProcessors, beanFactory); |
72 | registerBeanPostProcessors(beanFactory, internalPostProcessors); |
73 | //添加 ApplicationListenerDetector 探测器 |
74 | // Re-register post-processor for detecting inner beans as ApplicationListeners, |
75 | // moving it to the end of the processor chain (for picking up proxies etc). |
76 | beanFactory.addBeanPostProcessor(new ApplicationListenerDetector(applicationContext)); |
77 | } |
BeanPostProcessor 和 BeanFactoryPostProcessor 的源码处理区别
BeanFactoryPostProcessor
处理分为两种:硬编码
配置文件的方式
在
invokeBeanFactoryPostProcessors调用时同时完成了注册和激活的功能
BeanPostProcessor
- 处理方式: 配置的方式
BeanPostProcessor并不需要调用,所以不用考虑硬编码方式,只需要将其注册给BeanFactory
初始化消息资源 - initMessageSource();(国际化处理)
国际化信息的判断
- 语言类型
- 国家/地区类型
eg:中文本地化信息包括中国大陆地区化信息,又有中国台湾,中国香港, 还有新加坡的中文
java.util.Locale 类表示一个本地化对象,它允许通过语言参数和国家/地区参数创建一个确定的本地化对象。
java.util.Locale 是语言和国家/地区信息的本地化类,他是创建国际化应用的基础。
一下是几个实例:
1//1. 带有语言和国家/地区信息的本地化对象2Locale locale = new Locale("zh","CN");3//2. 只有语言信息的本地化对象4Locale locale = new Locale("zh");5//3. 等于Local("zh","CN)6Locale locale = Locale.CHINA7//4. 等于 Locale("zh");8Locale locale = Locale.CHINESE9//5. 获取本地系统默认的本地化对象10Locale locale = Locale.getDefault();JDK 的java.util 包中提供了几个支持本地化的格式化操作工具类:NumberFormat、DateFormat、MessageFormat,而在Spring 中的国际化资源操作业无非是对这些类的封装操作。一下我们介绍一下MessageFormat的用法:
1// 1. 信息格式化串2String pattern1 = "{0},你好,你与{1}在工商银行存入{2}元。";3String pattern2 = "At {1,time,short} On {1,date,long},{0} paid {2,number,currency}";4//2. 用户动态替换占位符参数5Object[] params = {"John",new GregorianCalendar().getTime(),1.0E3}6//3. 使用默认本地化对象信息7String msg = MessageFormat(pattern1,params);8//4. 使用指定的本地对象格式化信息9MessageFormat mf = new MessageFormat(pattern2,Locale.US);10String msg = mf.format(params);Spring 定义了访问国际化信息的MessageSource 接口,并提供了几个容易用的实现类。
MessageSource 分别被 HierarchicalMessageSource 和 ApplicationContext 接口扩展,这里我们要看一下 HierarchicalMessageSource 接口的几个实现类: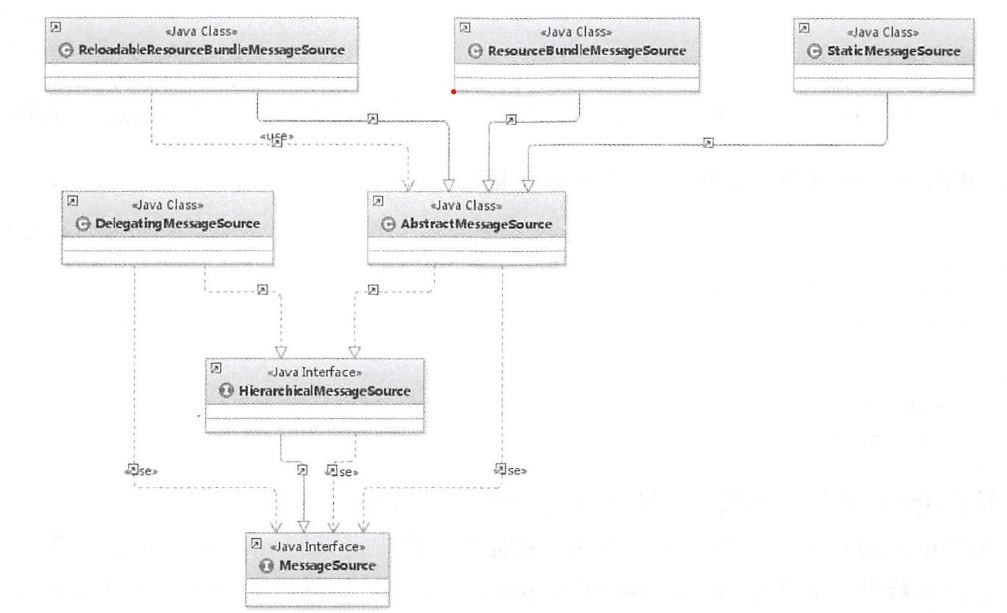
HierarchicalMessageSource 的最重要的连个实现类是 ResourceDundleMessageSource 和 ReloadableResourceBundleMessage。
他们基于java 的ResourceBundle 基础类实现,允许仅通过资源名加载国际化资源。ReloadableResourceBundleMessage。提供了定时刷新功能,允许在不重启系统的情况下更新资源信息。
StaticMessageSource 主要用于程序测试,他允许通过编程的方式提供国际化信息。
DelegatingMessageSource 是为方便操作父类 MessageSource而提供的代理类。
ResourceDundleMessageSource的实现方式:
- 定义资源文件
- messages.properties (默认:英文),内容仅一句:如下:
test=test - message_zh_CN.properties (简体中文):
test=测试
- messages.properties (默认:英文),内容仅一句:如下:
然后 cmd,打开命令窗口,输入 native2ascii-encoding gbk C:\message_zh_CN.properties C:\message_zh_CN_tem.properties. 然后将message_zh_CN_tem.properties 中的内容替换到 message_zh_CN.properties中,message_zh_CN.properties就是转码后的内容了。
2. 定义配置文件
1 | <!--bean 的id 必须命名为messageSource,否则会抛出NoSuchMessageException--> |
2 | <bean id="messageSource" class="org.Springframework.context.support.ResourceBundleMessageSource"> |
3 | <property name="basenames"> |
4 | <list> |
5 | <value>test/messages</value> |
6 | </list> |
7 | <property> |
8 | </bean> |
- 通过ApplicationContext 访问国际化信息
1String[] configs = {"applicationContext.xml"};2ApplicationContext ctx = new ClassPathXmlApplicationContext(configs);3//直接通过容器访问国际化信息4String str1 = ctx.getMessage("test",Params,Local.US);5String str2 = ctx.getMessage("test",Params,Local.CHINA);
源码分析
- initMessageResource 方法主要功能是提取配置中定义的messageResource,并将他们记录在spring 容器
applicationContext中。当然,如果用户未设置资源文件的化,Spring中提供了默认的配置 DelicatingMessageResource - 在 initMessageSource 中获取自定义资源文件的方式为:
beanFactory.getBean(MESSAGE_SPIRCE_BEAN_NAME,MessageSource.class);,在这里,是平日那个
使用了硬编码的方式硬性规定了自定义资源文件必须为message,否则获取不到自定义资源配置。1protected void initMessageSource() {2ConfigurableListableBeanFactory beanFactory = getBeanFactory();3if (beanFactory.containsLocalBean(MESSAGE_SOURCE_BEAN_NAME)) {4//如果在配置中已经配置了messageSource,那么将messageSource 提取并记录在 this.messageSource中5this.messageSource = beanFactory.getBean(MESSAGE_SOURCE_BEAN_NAME, MessageSource.class);6// Make MessageSource aware of parent MessageSource.7if (this.parent != null && this.messageSource instanceof HierarchicalMessageSource) {8HierarchicalMessageSource hms = (HierarchicalMessageSource) this.messageSource;9if (hms.getParentMessageSource() == null) {10// Only set parent context as parent MessageSource if no parent MessageSource11// registered already.12hms.setParentMessageSource(getInternalParentMessageSource());13}14}15if (logger.isTraceEnabled()) {16logger.trace("Using MessageSource [" + this.messageSource + "]");17}18}19else {20// 用户没有定义配置文件,那么使用 零时 DelegatingMessageSource作为调用getMessage方法返回。21// Use empty MessageSource to be able to accept getMessage calls.22DelegatingMessageSource dms = new DelegatingMessageSource();23dms.setParentMessageSource(getInternalParentMessageSource());24this.messageSource = dms;25beanFactory.registerSingleton(MESSAGE_SOURCE_BEAN_NAME, this.messageSource);26if (logger.isTraceEnabled()) {27logger.trace("No '" + MESSAGE_SOURCE_BEAN_NAME + "' bean, using [" + this.messageSource + "]");28}29}30} - 使用时:
1// AbstractApplicationContext2public String getMessage(String code, Object[] args, Locale locale)throws NoSuchMessageException{3return getMessageSource().getMessage(code,args,locale);4}
初始化 ApplicationEventMulticaster(事件广播器) - initApplicationEventMulticaster
使用
- 定义监听事件
1public class TestEvent extends ApplicationEvent{2public String msg;34public TestEvent(Object source){5super(source);6}78public TestEvent(Object source,String msg){9super(source);10this.msg = msg;11}1213public void print(){14System.out.println(msg);15}16} - 定义监听器
1public class TestListener implements ApplicationListener{23public void onApplicationEvent(ApplicationOnEvent event){4if(event instanceof TestEvent){5TestEvent testEvent = (TestEvent)event;6testEvent.print();7}8}9} - 添加配置文件
1<bean id="testListener" class ="xxx.xxx.TestListener"></bean> - 测试
1public class TestMain{2public static void main(String[] args){3ApplicationContext context = new ClassPathXmlApplicationContext("classpath:applicationContext.xml");4TestEvent test = new TestEvent("hello","message");5context.publishEvent(test);6}7}
- 当程序运行时,Spring 会将发出的TestEvent 事件传递给我们自定义的
TestListener,进行进一步处理。 此处使用了 观察者设计模式
源码分析
1 | protected void initApplicationEventMulticaster() { |
2 | ConfigurableListableBeanFactory beanFactory = getBeanFactory(); |
3 | //如果用户自定义了事件广播器,那么使用用户自定义的 |
4 | if (beanFactory.containsLocalBean(APPLICATION_EVENT_MULTICASTER_BEAN_NAME)) { |
5 | this.applicationEventMulticaster = |
6 | beanFactory.getBean(APPLICATION_EVENT_MULTICASTER_BEAN_NAME, ApplicationEventMulticaster.class); |
7 | if (logger.isTraceEnabled()) { |
8 | logger.trace("Using ApplicationEventMulticaster [" + this.applicationEventMulticaster + "]"); |
9 | } |
10 | } |
11 | else { |
12 | //否则,使用默认的 SimpleApplicationEventMulticaster |
13 | this.applicationEventMulticaster = new SimpleApplicationEventMulticaster(beanFactory); |
14 | beanFactory.registerSingleton(APPLICATION_EVENT_MULTICASTER_BEAN_NAME, this.applicationEventMulticaster); |
15 | if (logger.isTraceEnabled()) { |
16 | logger.trace("No '" + APPLICATION_EVENT_MULTICASTER_BEAN_NAME + "' bean, using " + |
17 | "[" + this.applicationEventMulticaster.getClass().getSimpleName() + "]"); |
18 | } |
19 | } |
20 | } |
依据观察者设计模式,作为广播器,一定是用于存放监听器并在适合的时候调用监听器,查看一下源码
1 | //SimpleApplicationEventMulticaster |
2 | public void multicastEvent(ApplicationEvent event) { |
3 | multicastEvent(event, resolveDefaultEventType(event)); |
4 | } |
5 | public void multicastEvent(final ApplicationEvent event, @Nullable ResolvableType eventType) { |
6 | ResolvableType type = (eventType != null ? eventType : resolveDefaultEventType(event)); |
7 | Executor executor = getTaskExecutor(); |
8 | for (ApplicationListener<?> listener : getApplicationListeners(event, type)) { |
9 | if (executor != null) { |
10 | executor.execute(() -> invokeListener(listener, event)); |
11 | } |
12 | else { |
13 | invokeListener(listener, event); |
14 | } |
15 | } |
16 | } |
可以判断,当产生Spring事件的时候,会默认使用 SimpleApplicationEventMulticaster的multicastEvent来广播事件,遍历所有监听器并使用监听器中的 void onApplicationEvent(E event); 来进行监听器的处理。而对于每一个监听器来说,所有的广播事件都可以获取到,但是是否处理由监听器自行决定。
模板方法,onRefresh() 子类去继承,进一步对业务功能进行扩展
注册监听器 registerListeners();
spring 的广播器时反复提到了事件监听器,那么spring 注册监听器的时候又做了哪些逻辑操作呢?
1 | protected void registerListeners() { |
2 | // Register statically specified listeners first. |
3 | //硬编码的方式注册监听器 |
4 | for (ApplicationListener<?> listener : getApplicationListeners()) { |
5 | getApplicationEventMulticaster().addApplicationListener(listener); |
6 | } |
7 | //配置文件方式注册监听器 |
8 | // Do not initialize FactoryBeans here: We need to leave all regular beans |
9 | // uninitialized to let post-processors apply to them! |
10 | String[] listenerBeanNames = getBeanNamesForType(ApplicationListener.class, true, false); |
11 | for (String listenerBeanName : listenerBeanNames) { |
12 | getApplicationEventMulticaster().addApplicationListenerBean(listenerBeanName); |
13 | } |
14 | |
15 | // Publish early application events now that we finally have a multicaster... |
16 | Set<ApplicationEvent> earlyEventsToProcess = this.earlyApplicationEvents; |
17 | this.earlyApplicationEvents = null; |
18 | if (earlyEventsToProcess != null) { |
19 | for (ApplicationEvent earlyEvent : earlyEventsToProcess) { |
20 | getApplicationEventMulticaster().multicastEvent(earlyEvent); |
21 | } |
22 | } |
23 | } |
初始化非延迟加载单例 - finishBeanFactoryInitialization
完成BeanFactory的初始化工作,其中包括 ConversionService 的设置,配置冻结以及非延迟加载bean的初始化工作。
1 | protected void finishBeanFactoryInitialization(ConfigurableListableBeanFactory beanFactory) { |
2 | // Initialize conversion service for this context. |
3 | if (beanFactory.containsBean(CONVERSION_SERVICE_BEAN_NAME) && |
4 | beanFactory.isTypeMatch(CONVERSION_SERVICE_BEAN_NAME, ConversionService.class)) { |
5 | beanFactory.setConversionService( |
6 | beanFactory.getBean(CONVERSION_SERVICE_BEAN_NAME, ConversionService.class)); |
7 | } |
8 | |
9 | // Register a default embedded value resolver if no bean post-processor |
10 | // (such as a PropertyPlaceholderConfigurer bean) registered any before: |
11 | // at this point, primarily for resolution in annotation attribute values. |
12 | if (!beanFactory.hasEmbeddedValueResolver()) { |
13 | beanFactory.addEmbeddedValueResolver(strVal -> getEnvironment().resolvePlaceholders(strVal)); |
14 | } |
15 | |
16 | // Initialize LoadTimeWeaverAware beans early to allow for registering their transformers early. |
17 | String[] weaverAwareNames = beanFactory.getBeanNamesForType(LoadTimeWeaverAware.class, false, false); |
18 | for (String weaverAwareName : weaverAwareNames) { |
19 | getBean(weaverAwareName); |
20 | } |
21 | |
22 | // Stop using the temporary ClassLoader for type matching. |
23 | beanFactory.setTempClassLoader(null); |
24 | //冻结所有的bean 定义,说明bean的定义将不被修改或者任何进一步的处理。 |
25 | // Allow for caching all bean definition metadata, not expecting further changes. |
26 | beanFactory.freezeConfiguration(); |
27 | //初始化剩下的非单例的实例。 |
28 | // Instantiate all remaining (non-lazy-init) singletons. |
29 | beanFactory.preInstantiateSingletons(); |
30 | } |
ConversionService 设置
之前我们提到过使用自定义转换器从String 转换为date 的方式。但是,Spring 还提供了另外一种转换方式:使用Converter.
- 定义转换器
- 之前我们了解了 自定义类型转换器从String 转换为 Date的形式。
- 在spring 中还提供了另外一种转换方式:使用Converter.
使用
- 定义转换器
1public class String2DateConverter implements Converter<String,Date>{23public Date convert(String arg0){4try{5return DateUtils.parseDate(args0, new String[]("yyyy-MM-dd HH:mm:ss"));6}catch(ParseExceptiono e){7return null;8}9}10} - 注册
1<bean id="conversionService" class="org.springframework.context.support.ConversionServiceFactoryBean">2<property name="converters">3<list>4<bean class="String2DateConverter"/>5</list>6</property>7</bean> - 测试
这样便可以使用Converter 为我们提供的功能。通过以上的功能我们看到了Convert 以及 ConversionService 提供的遍历功能,其中的配置就是在当前函数中被初始化的。1public void testStringToPhoneNumberConvert(){2DefaultConversionService conversionService = new DefaultConversionService();3String phoneNumberStr = "010-12345678";4PhoneNumberNodel phoneNumber = conversionService.convert(phoneNumberStr,PhoneNumberModel.class);5Assert.assertEquals("010",phoneNumber.getAreaCode());6}
冻结配置
冻结所有的bean定义,说明注册bean定义将不被修改或进行任何进一步的处理。
1 | public void freezeConfiguration(){ |
2 | this.configurationFrozen = true; |
3 | synchronized(this.beanDefinitionMap){ |
4 | this.frozenBeanDefinitionNames = StringUtils.toStringArray(this.beanDefinitionNames); |
5 | } |
6 | } |
初始化非延时加载
ApplicationContext 实现的默认行为就是 在启动时将所有单例bean提前进行实例化。 提前实例化意味着作为初始化的一部分,ApplicationContext 实例会创建并配置所有的单例bean。通常情况下这是一件好事,因为在配置中的任何错误就会立刻被发现,而这个实例化的过程是在 finitionBeamFactoryInitialization中完成的。
1 | //DefaultListableBeanFactory |
2 | public void preInstantiateSingletons() throws BeansException { |
3 | if (logger.isTraceEnabled()) { |
4 | logger.trace("Pre-instantiating singletons in " + this); |
5 | } |
6 | |
7 | // Iterate over a copy to allow for init methods which in turn register new bean definitions. |
8 | // While this may not be part of the regular factory bootstrap, it does otherwise work fine. |
9 | List<String> beanNames = new ArrayList<>(this.beanDefinitionNames); |
10 | |
11 | // Trigger initialization of all non-lazy singleton beans... |
12 | for (String beanName : beanNames) { |
13 | RootBeanDefinition bd = getMergedLocalBeanDefinition(beanName); |
14 | if (!bd.isAbstract() && bd.isSingleton() && !bd.isLazyInit()) { |
15 | if (isFactoryBean(beanName)) { |
16 | Object bean = getBean(FACTORY_BEAN_PREFIX + beanName); |
17 | if (bean instanceof FactoryBean) { |
18 | final FactoryBean<?> factory = (FactoryBean<?>) bean; |
19 | boolean isEagerInit; |
20 | if (System.getSecurityManager() != null && factory instanceof SmartFactoryBean) { |
21 | isEagerInit = AccessController.doPrivileged((PrivilegedAction<Boolean>) |
22 | ((SmartFactoryBean<?>) factory)::isEagerInit, |
23 | getAccessControlContext()); |
24 | } |
25 | else { |
26 | isEagerInit = (factory instanceof SmartFactoryBean && |
27 | ((SmartFactoryBean<?>) factory).isEagerInit()); |
28 | } |
29 | if (isEagerInit) { |
30 | getBean(beanName); |
31 | } |
32 | } |
33 | } |
34 | else { |
35 | getBean(beanName); |
36 | } |
37 | } |
38 | } |
39 | |
40 | // Trigger post-initialization callback for all applicable beans... |
41 | for (String beanName : beanNames) { |
42 | Object singletonInstance = getSingleton(beanName); |
43 | if (singletonInstance instanceof SmartInitializingSingleton) { |
44 | final SmartInitializingSingleton smartSingleton = (SmartInitializingSingleton) singletonInstance; |
45 | if (System.getSecurityManager() != null) { |
46 | AccessController.doPrivileged((PrivilegedAction<Object>) () -> { |
47 | smartSingleton.afterSingletonsInstantiated(); |
48 | return null; |
49 | }, getAccessControlContext()); |
50 | } |
51 | else { |
52 | smartSingleton.afterSingletonsInstantiated(); |
53 | } |
54 | } |
55 | } |
56 | } |
finitionRefish
在Spring 中还提供了Lifecycle 接口,Lifecycle 中包含start/stop 方法,实现此接口后Spring会保证在启动的时候调用其start方法开始生命周期,并在spring关闭的时候调用stop方法来结束生命周期。通常用配置后台程序,在启动后一直运行(如对MQ进行轮询等)。而ApplicatioinContext 的初始化最后正是保证了这一功能。
1 | protected void finishRefresh() { |
2 | // Clear context-level resource caches (such as ASM metadata from scanning). |
3 | clearResourceCaches(); |
4 | |
5 | // Initialize lifecycle processor for this context. |
6 | initLifecycleProcessor(); |
7 | |
8 | // Propagate refresh to lifecycle processor first. |
9 | getLifecycleProcessor().onRefresh(); |
10 | |
11 | // Publish the final event. |
12 | publishEvent(new ContextRefreshedEvent(this)); |
13 | |
14 | // Participate in LiveBeansView MBean, if active. |
15 | LiveBeansView.registerApplicationContext(this); |
16 | } |
initLifecycleProcessor
当ApplicationContext 启动或者停止时,他会通过LifecycleProcessor 来与所有声明的bean的周期做状态更新,而在LifiecycleProcessor 的使用前首先需要初始化。
1 | protected void initLifecycleProcessor() { |
2 | ConfigurableListableBeanFactory beanFactory = getBeanFactory(); |
3 | if (beanFactory.containsLocalBean(LIFECYCLE_PROCESSOR_BEAN_NAME)) { |
4 | this.lifecycleProcessor = |
5 | beanFactory.getBean(LIFECYCLE_PROCESSOR_BEAN_NAME, LifecycleProcessor.class); |
6 | if (logger.isTraceEnabled()) { |
7 | logger.trace("Using LifecycleProcessor [" + this.lifecycleProcessor + "]"); |
8 | } |
9 | } |
10 | else { |
11 | DefaultLifecycleProcessor defaultProcessor = new DefaultLifecycleProcessor(); |
12 | defaultProcessor.setBeanFactory(beanFactory); |
13 | this.lifecycleProcessor = defaultProcessor; |
14 | beanFactory.registerSingleton(LIFECYCLE_PROCESSOR_BEAN_NAME, this.lifecycleProcessor); |
15 | if (logger.isTraceEnabled()) { |
16 | logger.trace("No '" + LIFECYCLE_PROCESSOR_BEAN_NAME + "' bean, using " + |
17 | "[" + this.lifecycleProcessor.getClass().getSimpleName() + "]"); |
18 | } |
19 | } |
20 | } |
- onRefresh
启动所有实现了Lifecycle 接口的bean1//DefaultLifecycleProcessor23public void onRefresh() {4startBeans(true);5this.running = true;6}7private void startBeans(boolean autoStartupOnly) {8Map<String, Lifecycle> lifecycleBeans = getLifecycleBeans();9Map<Integer, LifecycleGroup> phases = new HashMap<>();10lifecycleBeans.forEach((beanName, bean) -> {11if (!autoStartupOnly || (bean instanceof SmartLifecycle && ((SmartLifecycle) bean).isAutoStartup())) {12int phase = getPhase(bean);13LifecycleGroup group = phases.get(phase);14if (group == null) {15group = new LifecycleGroup(phase, this.timeoutPerShutdownPhase, lifecycleBeans, autoStartupOnly);16phases.put(phase, group);17}18group.add(beanName, bean);19}20});21if (!phases.isEmpty()) {22List<Integer> keys = new ArrayList<>(phases.keySet());23Collections.sort(keys);24for (Integer key : keys) {25phases.get(key).start();26}27}28} - publishEvent
当完成ApplicationContext 初始化的时候,要通过Spring中的事件发布机制来发出ContextRefreshedEvent事件,以保证对应的监听器可以做进一步的逻辑处理。1public void publishEvent(ApplicationEvent event) {2publishEvent(event, null);3}4protected void publishEvent(Object event, @Nullable ResolvableType eventType) {5Assert.notNull(event, "Event must not be null");67// Decorate event as an ApplicationEvent if necessary8ApplicationEvent applicationEvent;9if (event instanceof ApplicationEvent) {10applicationEvent = (ApplicationEvent) event;11}12else {13applicationEvent = new PayloadApplicationEvent<>(this, event);14if (eventType == null) {15eventType = ((PayloadApplicationEvent<?>) applicationEvent).getResolvableType();16}17}1819// Multicast right now if possible - or lazily once the multicaster is initialized20if (this.earlyApplicationEvents != null) {21this.earlyApplicationEvents.add(applicationEvent);22}23else {24getApplicationEventMulticaster().multicastEvent(applicationEvent, eventType);25}2627// Publish event via parent context as well...28if (this.parent != null) {29if (this.parent instanceof AbstractApplicationContext) {30((AbstractApplicationContext) this.parent).publishEvent(event, eventType);31}32else {33this.parent.publishEvent(event);34}35}36}